Skip to content →

Tag: wordpress

Loading a second brain

Before ChatGPT, the hype among productivity boosters was a PKMs or Personal knowledge management system.

It gained popularity through Tiago Forte’s book ‘Building a second brain’, and (for academics perhaps a more useful read) ‘How to take smart notes’ by Sönke Ahrens.


These books promote new techniques for note-taking (and for storing these notes) such as the PARA-method, the CODE-system, and Zettelkasten.

Unmistakable Creative has some posts on the principles behing the ‘second brain’ approach.

Your brain isn’t like a hard drive or a dropbox, where information is stored in folders and subfolders. None of our thoughts or ideas exist in isolation. Information is organized in a series of non-linear associative networks in the brain.

Networked thinking is not just a more efficient way to organize information. It frees your brain to do what it does best: Imagine, invent, innovate, and create. The less you have to remember where information is, the more you can use it to summarize that information and turn knowledge into action.

and

A network has no “correct” orientation and thus no bottom and no top. Each individual, or “node,” in a network functions autonomously, negotiating its own relationships and coalescing into groups. Examples of networks include a flock of birds, the World Wide Web, and the social ties in a neighborhood. Networks are inherently “bottom-up” in that the structure emerges organically from small interactions without direction from a central authority.

-Tiago Forte, Tagging for Personal Knowledge Management

There are several apps you can use to start building your second brain, the more popular seem to be Roam Research, LogSeq, and Obsidian.

These systems allow you to store, link and manipulate a large collection of notes, query them as a database, modify them in various ways via plugins or scripts, and navigate the network created via graph-views.

Exactly the kind of things we need to modify the simple system from the shape of languages-post into a proper topos of the unconscious.

I’ve been playing around with Obsidian which I like because it has good LaTeX plugins, powerful database tools via the Dataview plugin, and one can execute codeblocks within notes in almost any programming language (python, haskell, lean, Mathematica, ruby, javascript, R, …).

Most of all it has a vibrant community of users, an excellent forum, and a well-documented Obsidian hub.

There’s just one problem, I’m a terrible note-taker, so how can I begin to load my ‘second brain’?

Obsidian has several plugins to import data, such as your Kindle highlights, your Twitter feed, your Readwise-data, and many others, but having been too lazy in the past, I cannot use any of them.

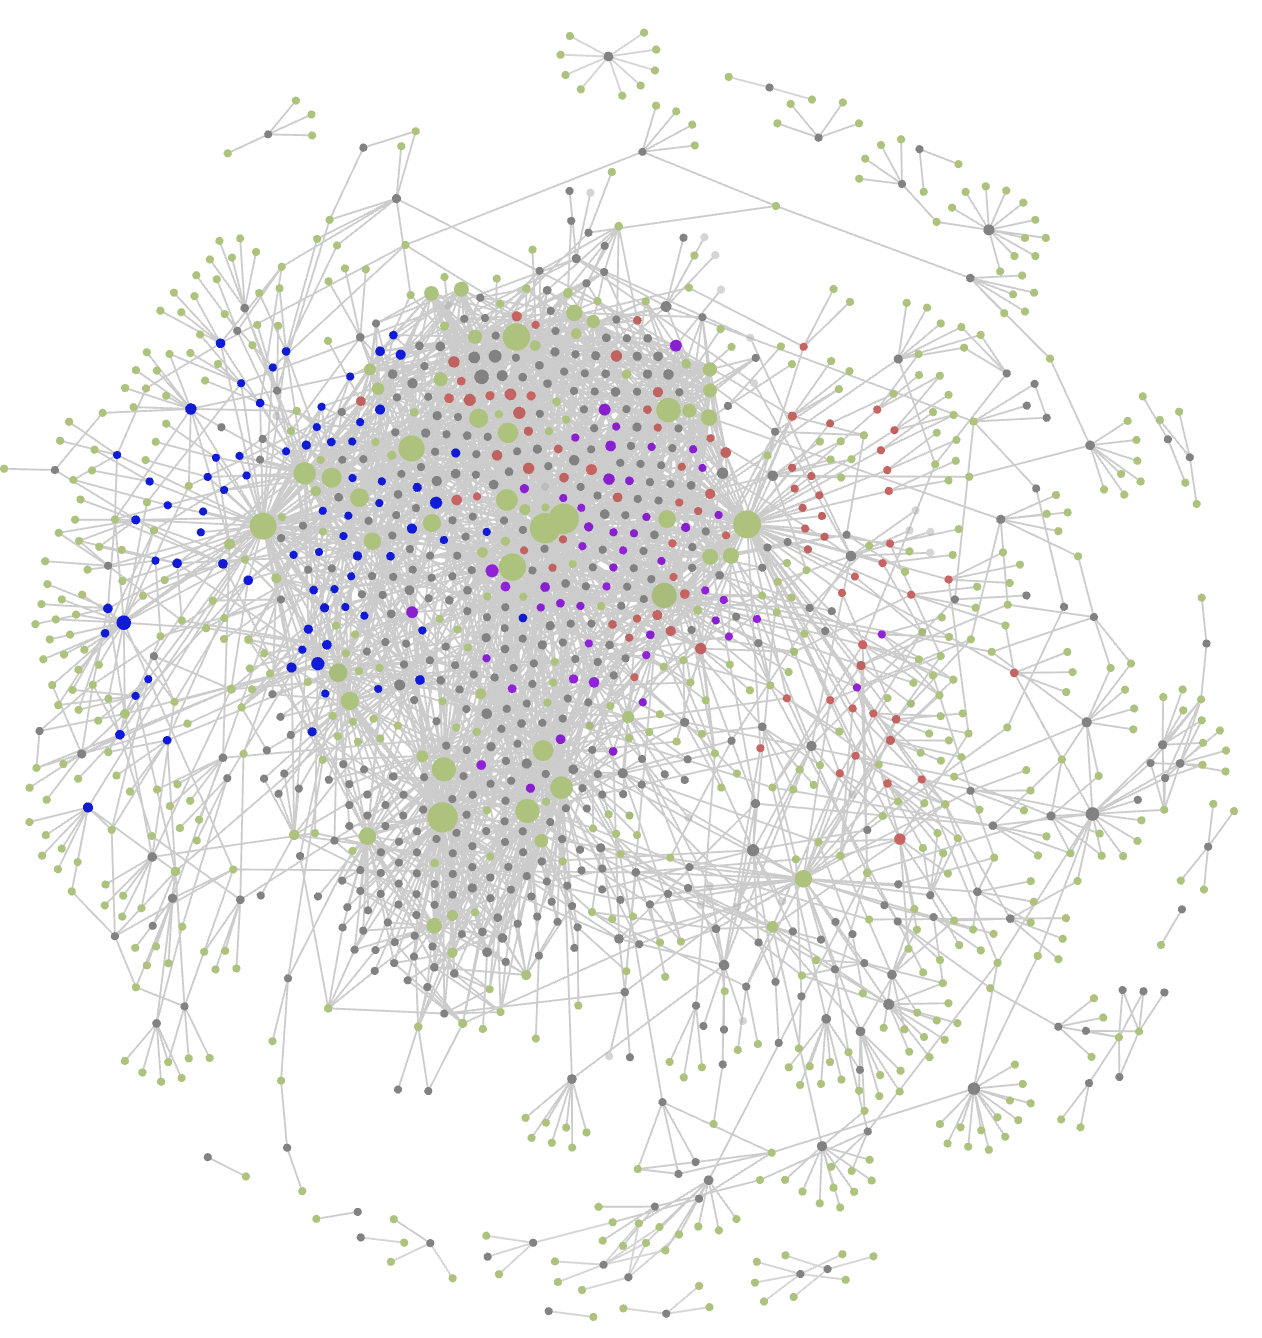
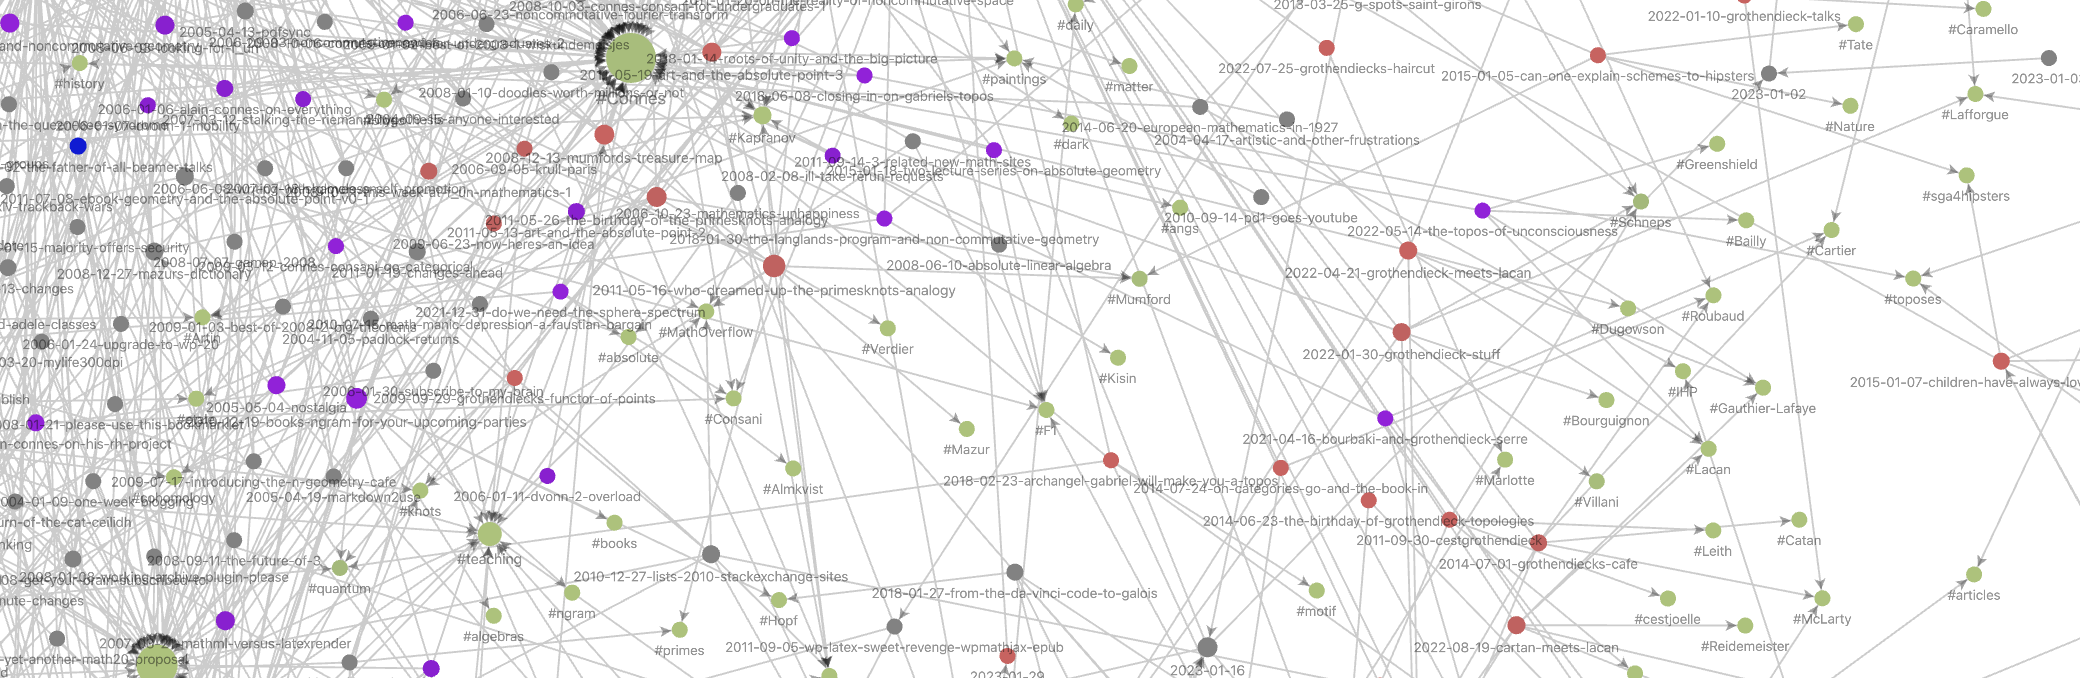
In fact, the only useful collection of notes I have are my blog-posts. So, I’ve uploaded NeverEndingBooks into Obsidian, one note per post (admittedly, not very Zettelkasten-like), half a million words in total.

Fortunately, I did tag most of these posts at the time. Together with other meta-data this results in the Graph view below (under ‘Files’ toggled tags, under ‘Groups’ three tag-colours, and under ‘Display’ toggled arrows). One can add colour-groups based on tags or other information (here, red dots are posts tagged ‘Grothendieck’, the blue ones are tagged ‘Conway’, the purple ones tagged ‘Connes’, just for the sake of illustration). In Obsidian you can zoom into this graph, place a pointer on a node to highlight the connecting dots, and much more.


Because I tend to forget such things, and as it may be useful to other people running a WordPress-blog making heavy use of MathJax, here’s the procedure I followed:

1. Follow the instructions from Convert wordpress articles to markdown.

In the wizard I’ve opted to go only for yearly folders, to prefix posts with the date, and to save all images.

2. This gives you a directory with one folder per year containing markdown versions of your posts, and in each year-folder a subfolder ‘img’ containing all images.

Turn this directory into an Obsidian-vault by opening Obsidian, click on the ‘open another vault’ icon (third from bottom-left), select ‘Open folder as vault’ and navigate to your directory.

3. You will notice that most of your LaTeX cannot be parsed because during the markdown-process backslashes are treaded as special character, resulting in two backslashes for every LaTeX-command…

A remark before trying to solve this: another option might be to use the wordpress-to-hugo-exporter, resulting in clean LaTeX, but lacking the possibility to opt for yearly-folders (it dumps all posts into one folder), and it makes a mess of the image-files.

4. So, we will need to do a lot of search&replaces in all files, and need a convenient tool for this.

First option was the Sublime Text app, which is free and does the search&replaces quickly. The problem is that you have to save each of the files, one at a time! This may take hours.

I’ve done it using the Search and Replace app (3$) which allows you to make several searches/replaces at the same time (I messed up LaTeX code in previous exports, so needed to do many more changes). It warns you that it is dangerous to replace strings in all files (which is the reason why Sublime Text makes it difficult), you can ignore it, but only after you put the ‘img’ folders away in a safe place. Otherwise it will also try to make the changes to these files, recognise that they are not text-files, and drop them altogether…

That’s it.

I now have a backup network-version of this blog.


As we mentioned in the previous post a first attempt to construct the ‘topos of the unconscious’ might be to start with a collection of notes (the ‘conscious’) and work on the semantics of text-snippets to unravel (a part of) the unconscious underpinning of these notes. We also mentioned that the poset-structure in that post should be replaced by a more involved network structure.

What interests me most is whether such an approach might be doable ‘in practice’, and Obsidian looks like the perfect tool to try this out.

What we need is a sufficiently large set of notes, of independent interest, to inject into Obsidian. The more meta it is, the better…

(tbc)

Previously in this series:

Next:

The enriched vault

Leave a Comment

The joys of running a WordPress blog

Earlier today, John Duncan (of moonshine fame) emailed he was unable to post a comment to the previous post:
“I went to post a comment but somehow couldn’t convince the website to cooperate.”

There’s little point in maintaining a self-hosted blog if people cannot comment on it. If you tried, you got this scary message:

Catchable fatal error: Object of class WP_Error could not be converted to string in /wp-includes/formatting.php on line 1031

The days I meddled with wordpress core php-files are long gone, and a quick Google search didn’t come up with anything helpful.

In despair, there’s always the database to consider.

Here’s a screenshot of this blog’s database in phpMyAdmin:

No surprise you cannot comment here, there isn’t even a wp_comments table in the database! (though surprisingly, there’s a table wp_commentmeta…)

Two weeks ago I moved this blog to a new iMac. Perhaps the database got corrupted in the process, or the quick export option of phpMyAdmin doesn’t include comments (unlikely), or whatever.

Here’s what I did to get things working again. It may solve your problem if you don’t have a backup of another wordpress-blog with a functional wp_comments table.

1. Set up a new WordPress blog in the usual way, including a new database, let’s call it ‘newblog’.

2. In phpMyAdmin drop all tables in newblog except for wp_comments.

3. Export your blog’s database, say ‘oldblog’, via the ‘quick export’ option in phpMyAdmin to get a file oldblog.sql.

4. If this file is small you can use phpMyAdmin to import it into newblog. If not you need to do it with this terminal-command

mysql -h localhost -u root – p newblog < oldblog.sql

and have the patience for this to finish.

5. Change in your wp-config file the oldblog database to newblog.

Happy commenting!

Leave a Comment

From WordPress to ePublishing (1)

Perhaps, the tips and tricks I did receive to turn a selection of wordpress-posts into a proper ePub-file may be of use to others, so I will describe the procedure here in some detail.

It makes a difference whether or not some of the posts contain TeX. This time, I’ll sketch the process for non-LaTeX posts and hence we will turn the Bourbaki-code posts into ePub-format to read on your iPad, rather than merely into a pdf-file as last time. Next time, I’ll add some tricks to repeat this when some of your posts do contain LaTeX.

1. Install the ePub export plugin

Get the epub export wordpress plugin, install and activate it in the usual way. ePub Export automatically creates an ePub file when a post or page is published or updated. The ePubs are stored in the uploads directory. For later use, remember that your uploads directories are located under BLOGHOME/wp-content/uploads.

2. Update the posts you want to include

Decide which posts you want to include in your eBook, edit them (or not) and press for each one of them the update-button. This will populate today’s uploads-directory with a number of epub-files. Transfer them all, for example using Transmit, to a directory on your home-computer, named say MyFirstEBook.


3. Unpack the epub-files

The crucial fact to remember about epub-files is that they are really zipped archives containing xhtml-, css- and other files and directories. As we want to edit some of those, we first have to unpack the directories. So, change the .epub extensions to .zip and double-click on them to create the directories.


The crucial files in each directory are preface.xhtml (containing title author and blog-name), text.html (containing the blog-post) and the images-directory (containing copies of all the images used in the post).

4. Rename the directories user-friendly

As all the posts will be chapters in our eBook in some specific order, we will rename the numbers of the directories to something more user-friendly such as shortened blog-titles. To do this, double-click in each of the directories on the preface.xhtml file. This will open Safari and will show the title of the blog-post. Use it to rename that directory. For convenience let us call the directory corresponding to the first chapter in our book MasterDirectory

5. Move all images to the master directory

For each of the other chapter-directories, drag all the files contained in the images-subdirectory to MasterDirectory/images.

6. Edit the MasterDirectory/text.xhtml file

Because we will have to open and copy-paste all the text.xhtml files of the different directories, it is perhaps best to rename momentarily the MasterDirectory/text.xhtml file to something like master.xhtml.

Now, open this file with a text-processor such as TextWrangler. Edit it to remove unwanted html-code (such as links to other posts at the start if you are using the series-plugin, or previous/next post links at the end). Also add the title of the blog-post between h1-tags (and if you want to include a table of contents later, give it an anchor-name).

Go to the directory of your second chapter, open that text.xhtml file and copy/paste only the post-content over to the master-xhtml file at the appropriate place. As before, add title/anchor before the copied post-content.

Repeat this procedure, in order, for all the chapters of your eBook.

Once finished, doubleclick the master.xhtml file and correct remaining errors (as it is an xhtml-file, it is rather picky about opening and closing tags) and see whether all your images are included. If you’re satisfied with it, rename the master.xhtml to text.xhtml (don’t forget this!).

7. Edit the MasterDirectory/preface.xhtml file

Open the preface.xhtml file and change the first blogpost-title to the title of your booklet, alter your name (by default it uses your wp-nick) and add a frontipiece-picture if you so desire.

8. Re-package the directory into an epub-file

This is the (only) tricky part. E-book readers require that the mimetype file is the first one in the zip document. What’s more, to be fully compliant, this file should start at a very specific point – a 30-byte offset from the beginning of the zip file (so that the mimetype text itself starts at byte 38).

Here’s how to do this on a Mac (Linux-users being the geeks they are will have given up on reading this post a while ago and as to Windows-users, yeah well …). Open Terminal.app and cd to your MasterDirectory. Now type:

zip -X MyFirstEBook.epub mimetype

Next, type:

zip -rg MyFirstEBook.epub * -x *.DS_Store

(of course you’ll have to change your book-title to whatever you want). If you want to know more about these 2 magical commands, read this post.

9. Edit metadata

Get Calibre and add the MyFirstEBook.epub to Calibre by clicking on the ‘Add Books’ button.


You can preview your eBook by clicking on the ‘View’-button. Next, click the ‘Edit metadata’-button and alter the title and author entries (and whatever else you want to include) and click the OK button. Then click ‘Save to disk’.

10. Read your eBook on your iPad

Finally, we want to see how it looks on the iPad. Mail MyFirstEBook.epub to yourself as attachement, open it with iBooks and enjoy!

Leave a Comment