Fortunately,
there is a drastic shortcut to the general tree-argument of last time, due to
Roger Alperin. Recall that the Moebius
transformations corresponding to u resp. v send z resp. to
$-\frac{1}{z} $ and $\frac{1}{1-z} $
whence the Moebius transformation
corresponding to $v^{-1} $ send z to $1-\frac{1}{z} $.
Consider
the set $\mathcal{P} $ of all positive irrational real numbers and the
set $\mathcal{N} $ of all negative irrational real numbers and observe
that
$u(\mathcal{P}) \subset \mathcal{N} $ and
$v^{\pm}(\mathcal{N}) \subset \mathcal{P} $
We have to show
that no alternating word $w=(u)v^{\pm}uv^{\pm}u \dots v^{\pm}(u) $ in
u and $v^{\pm} $ can be the identity in $PSL_2(\mathbb{Z}) $.
If the
length of w is odd then either $w(\mathcal{P}) \subset
\mathcal{N} $ or $w(\mathcal{N}) \subset
\mathcal{P} $ depending on whether w starts with a u or with
a $v^{\pm} $ term. Either way, this proves that no odd-length word can
be the identity element in $PSL_2(\mathbb{Z}) $.
If the length of
the word w is even we can assume that $w = v^{\pm}uv^{\pm}u \dots
v^{\pm}u $ (if necessary, after conjugating with u we get to this form).
There are two subcases, either $w=v^{-1}uv^{\pm}u \dots
v^{\pm}u $ in which case $w(\mathcal{P}) \subset v^{-1}(\mathcal{N}) $
and this latter set is contained in the set of all positive irrational
real numbers which are strictly larger than one .
Or, $w=vuv^{\pm}u \dots v^{\pm}u $ in which case
$w(\mathcal{P}) \subset v(\mathcal{N}) $ and this set is contained in
the set of all positive irrational real numbers strictly smaller than
one .
Either way, this shows that w cannot be the identity
morphism on $\mathcal{P} $ so cannot be the identity element in
$PSL_2(\mathbb{Z}) $.
Hence we have proved that
$PSL_2(\mathbb{Z}) = C_2 \ast C_3 = \langle u,v : u^2=1=v^3 \rangle $
A
description of $SL_2(\mathbb{Z}) $ in terms of generators and relations
follows
$SL_2(\mathbb{Z}) = \langle U,V : U^4=1=V^6, U^2=V^3 \rangle $
It is not true that $SL_2(\mathbb{Z}) $ is the free
product $C_4 \ast C_6 $ as there is the extra relation $U^2=V^3 $.
This relation says that the cyclic groups $C_4 = \langle U \rangle $
and $C_6 = \langle V \rangle $ share a common subgroup $C_2 = \langle
U^2=V^3 \rangle $ and this extra condition is expressed by saying that
$SL_2(\mathbb{Z}) $ is the amalgamated free product of $C_4 $ with
$C_6 $, amalgamated over the common subgroup $C_2 $ and denoted
as
$SL_2(\mathbb{Z}) = C_4 \ast_{C_2} C_6 $
More
generally, if G and H are finite groups, then the free product $G
\ast H $ consists of all words of the form $~(g_1)h_1g_2h_2g_3
\dots g_nh_n(g_{n-1}) $ (so alternating between non-identity
elements of G and H) and the group-law is induced by concatenation
of words (and group-laws in either G or H when end terms are
elements in the same group).
For example, take the dihedral groups $D_4
= \langle U,R : U^4=1=R^2,(RU)^2=1 \rangle $ and $D_6 = \langle V,S :
V^6=1=S^2,(SV)^2=1 \rangle $ then the free product can be expressed
as
$D_4 \ast D_6 = \langle U,V,R,S :
U^4=1=V^6=R^2=S^2=(RV)^2=(RU)^2 \rangle $
This almost fits in with
our obtained description of
$GL_2(\mathbb{Z}) $
$GL_2(\mathbb{Z}) = \langle U,V,R :
U^4=1=V^6=R^2=(RU)^2=(RV)^2, U^2=V^3 \rangle $
except for the
extra relations $R=S $ and $U^2=V^3 $ which express the fact that we
demand that $D_4 $ and $D_6 $ have the same subgroup
$D_2 = \langle U^2=V^3,S=R \rangle $
So, again we can express these relations by
saying that $GL_2(\mathbb{Z}) $ is the amalgamated free product of
the subgroups $D_4 = \langle U,R \rangle $ and $D_6 = \langle V,R
\rangle $, amalgamated over the common subgroup $D_2 = C_2 \times C_2 =
\langle U^2=V^3,R \rangle $. We write
$GL_2(\mathbb{Z}) = D_4
\ast_{D_2} D_6 $
Similarly (but a bit easier) for
$PGL_2(\mathbb{Z}) $ we have
- $PGL_2(\mathbb{Z}) = \langle u,v,R
- u^2=v^3=1=R^2 = (Ru)^2 = (Rv)^2 \rangle $
which can be seen as
the amalgamated free product of $D_2 = \langle u,R \rangle $ with $D_3
= \langle v,R \rangle $, amalgamated over the common subgroup $C_2 =
\langle R \rangle $ and therefore
$PGL_2(\mathbb{Z}) = D_2
\ast_{C_2} D_3 $
Now let us turn to congruence subgroups of
the modular group.
With $\Gamma(n) $ one denotes the kernel of the natural
surjection
$PSL_2(\mathbb{Z}) \rightarrow
PSL_2(\mathbb{Z}/n\mathbb{Z}) $
that is all elements represented by a matrix
$\begin{bmatrix} a
& b \\ c & d \end{bmatrix} $
such that a=d=1 (mod n) and b=c=0
(mod n). On the other hand $\Gamma_0(n) $ consists of elements
represented by matrices such that only c=0 (mod n). Both are finite
index subgroups of $PSL_2(\mathbb{Z}) $.
As we have seen that
$PSL_2(\mathbb{Z}) = C_2 \ast C_3 $ it follows from general facts
on free products that any finite index subgroup is of the
form
$C_2 \ast C_2 \ast \dots \ast C_2 \ast
C_3 \ast C_3 \ast \dots \ast C_3 \ast C_{\infty}
\ast C_{\infty} \dots \ast C_{\infty} $
that is the
free product of k copies of $C_2 $, l copies of $C_3 $ and m copies
of $C_{\infty} $ where it should be noted that k,l and m are allowed
to be zero. There is an elegant way to calculate explicit generators of
these factors for congruence subgroups, due to Ravi S. Kulkarni (An
Arithmetic-Geometric Method in the Study of the Subgroups of the Modular
Group , American Journal of Mathematics, Vol. 113, No. 6. (Dec.,
1991), pp. 1053-1133) which deserves another (non-course) post.
Using this method one finds that $\Gamma_0(2) $ is generated by
the Moebius transformations corresponding to the
matrices
$X=\begin{bmatrix} 1 & 1 \\ 0 & 1 \end{bmatrix} $ and
$Y=\begin{bmatrix} 1 & -1 \\ 2 & -1 \end{bmatrix} $
and that
generators for $\Gamma(2) $ are given by the
matrices
$A=\begin{bmatrix} 1 & 0 \\ -2 & 1 \end{bmatrix} $
and $B=\begin{bmatrix} 1 & -2 \\ 2 & -3 \end{bmatrix} $
Next,
one has to write these generators in terms of the generating matrices
u and v of $PSL_2(\mathbb{Z}) $ and as we know all relations between
u and v the relations of these congruence subgroups will follow.
We
will give the details for $\Gamma_0(2) $ and leave you to figure out
that $\Gamma(2) = C_{\infty} \ast C_{\infty} $ (that is that
there are no relations between the matrices A and
B).
Calculate that $X=v^2u $ and that $Y=vuv^2 $. Because the
only relations between u and v are $v^3=1=u^2 $ we see that Y is an
element of order two as $Y^2 = vuv^3uv^2= v^3 = 1 $ and that no power of
X can be the identity transformation.
But then also none of the
elements $~(Y)X^{i_1}YX^{i_2}Y \dots YX^{i_n}(Y) $ can be the identity
(write it out as a word in u and v) whence,
indeed
$\Gamma_0(2) = C_{\infty} \ast C_2 $
In fact,
the group $\Gamma_0(2) $ is staring you in the face whenever you come to
this site. I fear I’ve never added proper acknowledgements for the
beautiful header-picture
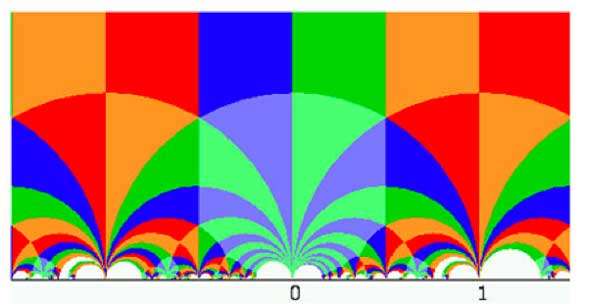
so I’d better do it now. The picture is due to Helena
Verrill and she has a
page with
more pictures. The header-picture depicts a way to get a fundamental
domain for the action of $\Gamma_0(2) $ on the upper half plane. Such a
fundamental domain consists of any choice of 6 tiles with different
colours (note that there are two shades of blue and green). Helena also
has a
Java-applet
to draw fundamental domains of more congruence subgroups.