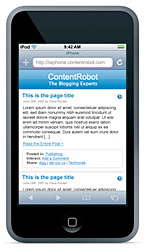
Skip to content →

Tag: OSX

WarWalking (3)


This time we turn to Ethereal, ‘sniffing the glue that holds the
Internet together’. Here is the description they give : “Ethereal is a
free network protocol analyzer for Unix and Windows. It allows you to
examine data from a live network or from a capture file on disk. You can
interactively browse the capture data, viewing summary and detail
information for each packet. Ethereal has several powerful features,
including a rich display filter language and the ability to view the
reconstructed stream of a TCP session”. Whereas OSX is not included it
is possible to get Ethereal running under OSX but it
requires some work. To begin you need to have the XTools
installed (the extra CD shipped with 10.3) (btw. you probably needed
already the XTools to get Kismet up and running). Secondly, you
need to have X11 in Applications/Utilities. This is not a
standard option if you install 10.3 but with a custom install you can
install X11. If you haven’t done this, no problem, you can download X11
from the apple-site (43Mb! download). And finally you need
to have Fink installed (see a previous
post
). If you are set, open the Terminal and type

sudo fink install ethereal-ssl

Fink will tell you that it needs some additional packages to
install (12 in my case) and you agree to this with typing Y. Get
yourself a coffee and a book or newspaper because the compilation
process takes quite a while (in my case it took over one hour!). When it
finally stops you hope to be done, so start up X11 and type

sudo /sw/bin/ethereal

and it
works! If you want to begin sniffing you have to click on
Capture/Start and a pop-up window appears. Specify en1 as
Interface and click on Ok. If after some time you press
Stop all the captured packages appear in the main window and you
can start playing. We will see another time what exactly you can do with
all this information…

The previous time that I
tried to install Ethereal (on an iBook) I got an error message :
dyld: /sw/bin/ethereal can’t open library: /sw/lib/libdl.0.dylib (No
such file or directory, errno = 2)
. Fortunately a simple Google gave
me the following work-around. So if you get into problems that will
probably solve them. I also needed to type xhost in X11 to
allow su to use my window. But, none of these problems appeared right
now so maybe they updated the package.

Moreover,
Ethereal is very well documented both with an online manual-page and a User’s guide (which you can also download as
PDF-file : 454 pages! but only the first 100 or so are worth
printing).

Leave a Comment

WarWalking (2)


MacStumbler and iStumbler are active scanners sending out
probe messages to the basestations and can therefore be detected easily.
Moreover, they are not able to detect closed networks. So let us
move up one step in the secrecy scale and get some passive network
scanners
running. The first one is KisMAC which instructs the Airport card to tune to
a channel, listen a while, then tune to the next channel and so on. In
this way KisMAC can detects networks without announcing its
presence and can also find closed networks. More information can
be found at the KisMAC documentation page.
Installation is pretty straightforward : click on the KisMAC
installer
icon and after answering a few obvious questions you need
to provide your Administer-login and password after which KisMAC
is installed in your Applications-folder so also copy it to your
dock. The reason why it needs admin privileges to run is that the
Airport card cannot perform passive monitoring. So it swaps to open
source Viha driver for your Airport-driver on startup and
reinstalls the Airport driver on exit (that is, is everything goes well,
sometimes you seem to have lost your Airport connection afterwards but
no harm is done which cannot be solved by either checking in your
SystemPreferences:Network or by a restart. So do not worry if you
see that your Airport icon (as well as all your usual wireless access
such as Internet and Mail) vanishes. Before you can perform a scan, you
have to go to the KisMAC-Preferences and choose under Driver a
capturing device (in some versions of KisMAC you have to specify Viha
driver
if you are running an Airport card, in others you have to go
for the option Apple Airport Card,Passive mode. If you press the
Scan button you are again asked for admin-password to perform the
driver-switch (the same happens if you Quit KisMAC). The program gives a
wealth of information which can be quite useful if you want to find out
about possible interference of your ABS with other wireless sources. We
will come back to some of these features later, a rather scary one is
the ability to log raw 802.11 frames to a dump which can then be fed to
Ethereal.

Okay,
let us go one step further and try to get Kismet
running. It seems to be an unwritten law in open source-software that
the more potential harmful a program is, the more difficult it is to
install, so installing Kismet is by no means trivial.
Fortunately, Kismet is very well documented with a manual and a forum. First, we need the Viha Airport
driver
, that is we need Viha Wireless Tools 0.0.1a Binary Release. Go in Terminal to the
Desktop-folder where you will find the Folder Viha-0.0.1a.
Then type

mv Viha-0.0.1a/WiFi.framework/
/Library/Frameworks/

Next, we get the latest
version of Kismet, that is kismet-3.0.1.tar.gz and get a kismet-3.0.1
folder on our Desktop. Use Terminal to go into this folder and
type

./configure –disable-pcap –enable-viha;
make

and the following process may last for a
while. If you finally get a prompt, type

sudo make
install

and the process will end with some
warning messages :

If you have not done so
already, read the README file and the FAQ file. Additional
documentation is in the docs/ directory. You MUST edit
/usr/local/etc/kismet.conf
and configure Kismet for your
system, or it will NOT run properly!
Kismet has NOT been
installed suid-root. This means you will need to start
it as
root. If you have no untrusted users on your system, it can be
installed
as suid-root via ‘make suidinstall’. READ THE
DOCUMENTATION BEFORE INSTALLING KISMET AS SUID-ROOT!”

Fine, so let us go to /usr/local/etc and change the
following lines in kismet.conf

suiduser=lieven
source=viha,en1,Airport

(of course you have to replace lieven by your
normal OSX login name). Further, in the file kismet_ui.conf
replace the last line by

apm=false

Finally, you have to type in the Terminal

export TERM=xterm-color

and you should
be done. To launch Kismet, type as your usual user (the one you
specified in the kismet.conf file) in the Terminal

Kismet

and all will work. Again there is
a switch of Airport to Viha driver (and if all works well also at the
end). Often, the Airport card does not come up at the end in which case
it is best to restart Kismet and Quit again (btw. you quit Kismet with
capital Q). Then the Airport icon appears but it may be that you have to
logon to your network again.

We wouldnt have done so
much trouble if it were not that Kismet is a VERY powerfull
application which can be used to Hack wireless networks. But if you
think that KisMAC and Kismet are already scary, wait until
next time when we deal with Ethereal

Leave a Comment

WarWalking (1)


What exactly is a \’WarDriver\’? WarDriver: One who locates and logs
wireless access points while in motion ;[benign]. WarDriving was
invented by Peter Shipley and now commonly practiced by hobbyists,
hackers and security analysts worldwide. More information about this
trend can be found at wardriving.com. Even if you are not into this
sport, the following (innocent) software may be of use to obtain
information about your wireless network. In a next message I\’ll discuss
a few less innocent software tools. Probably the most popular network
scanner
for Mac OSX is MacStumbler. It detects nearby wireless networks,
tells you the channels they use, whether they use WEP
(encryption), give their signal (and noise) strength, the name of the
network and if you click on the Details button it gives you
(among other things) the MAC-address. A similar tool is iStumbler. It
gives roughly the same information : SSID (name). MAC-address,
signal/noise, channel and whether it is encrypted. More information is
available from the iStumbler manual. In addition it presents a
signal graph which is useful if you are trying to decide on which
signal you will let your Airport-basestation broadcast. Using
iStumbler i discovered that there was a recurrent noise at
channel 5 every couple of minutes (don\’t ask what it was) but that on
channel 1 the signal was not interrupted.

Both
MacStumbler and iStumbler are active scanners
meaning that they send out probe request to nearby access points. As a
result they are not able to detect closed networks. To detect
them you need far more intrusive passive scanning software, but
that is for next time.

One Comment

the best LaTeX system

If you are
a mathematician, you’d better have a functioning TeX on your computer
which I do not have at the moment as I completely erased my HD yesterday
and started brand new. Some time ago this would make me slightly nervous
but as I did install TeX on a number of computers recently I hope to get
it up and running in no time. However, as the install process changes
slighly each time I’ll log here my actions for future reference.
Further this log may convince you to buy a Macintosh because I really do
not know of a better TeX system around.

A good source
for TeX material is the PennState Mac-TeX page. The
first thing to do is to get a good editor such as the freeware BBedit
Lite
but the present link directs to the commercial version so has this
Lite version been taken off the net? Fortunately not, a quick
Google tells me that BareBones still maintain a BBedit Lite page from which you can get the 6.1.2
version (it contains a version for OS X and one running under System 9),
so copy the BBedit Folder to the ApplicationFolder and the OSX program
to the Dock.

Next, we will need a spelling checker
like Excalibur which you can find under the
Tools/Utilities of the PennState-site. So download from the links
: Excalibur 4.0 (782k), the Mathematical Lexicon (29k) and the Dutch
dictionary (791k), put these two Folders (or any other Dictionaries you
like to download) in the ExcaliburFolder and copy this to the
ApplicationsFolder and Excalibur itself to the Dock. These matters
settled, it is now time for the big gun : TeX itself.

You can get there from the Engines subsection of the
PennSate site but it’s better to go directly to the excellent TeX on Mac OS X page and follow the instructions (which as I mentioned before tend
to change slightly). I used to get the iInstaller first and
install then the required packages but this time I’ll go for the quick
and dirty route : I’ll get myself the TeX-fat.dmg disk image
(77Mb) which contains TeX and Ghostscript 8 and the i-Installer!
What you obtain is a Volume with the i-Installer, a i-Packages
Folder, some files to read and the TeX-fat.iid. Take the
i-Installer to the Applications/Utilities Folder and to the Dock.
Drag the TeX-fat.iid file on the mounted volume on the i-Installer
application icon. You will be presented with an i-Directory with two
packages on the volume. Install all of them. It is best to install
ghostscript after you have installed TeX as it may contain configuration
material that can take advantage of TeX. I got a warning message but
choose to ignore it, seems to install as expected. Along the way you are
asked a few simple questions (such as paper size, formats you want to
have etc.) when in doubt go for the default! Okay : Task finished! But I
still have to install the ghostscript 8 package but this goes a lot
faster. So we should now have a working TeX installation but are still
missing a front-end. These you can download fllowing the links at
the beginning of the TeX on Mac OS X page. I usually go for TeXShop which is a 3.1Mb disk-image download. Drag
TeXShop into the ApplicationsFolder and the Dock. Find the file named
“pdfsync.sty” in the distribution directory. Drag a copy of this file
to ~/Library/texmf/tex/latex. Here ~/Library is the Library folder in
your home directory. You may need to create the folders texmf, tex, and
latex if they do not already exist. Alternatively, you can gp for iTeXMac (I never figured out what went wrong
between these two developers, but surely it was something
big).

At a later stage I am sure I want to add
new style files from CTAN. So here is the drill : copy them in the
diectory

/usr/local/teTeX/share/texmf.local/tex/latex/…

and do a texhash from the command line (as root).
I noticed that lately one do no longer need to adjust parameters to get
a heavy xy-pic file being compiled but if one does not to change any of
the values : be root and go to

/usr/local/teTeX/share/texmf/web2c/texmf.cnf

increase values and do a texhash. Finally, if you want to
print chess or go-diagrams or other fancy pictures requiring
metafont files here is the drill : be root and copy the .mf files
in an apropriate directory under

/usr/local/teTeX/share/texmf/fonts/source/public/

(if necessary change the owner of the directory) and
then do a texhash.

One Comment

a blogging 2004


As it is probably better to run years behind than to stand eternally still, I’ll try out how much of a blogger I am in 2004. If you want to read more about blogging, Rebecca’s pocket is a good place to start. She has written an essay on the early days of
the weblog
, an article on weblog ethics and a couple of (pretty obvious) tips for a better
weblog.

But let us not talk about ‘better’ or ‘ethical’ at this moment, I’m just starting out. Give me a couple of weeks/months to develop my own style and topics and I’ll change the layout accordingly.

For now, I’ve taken the free blog-tool pMachine which uses only PHP and MySQL on the server-side so I should be able to get the layout suited to my own mood shortly. A major advantage of a weblog over a homepage is that you can feed it to programs called news aggregators by subscribing.

The program can then be tuned so that it ventures out on the net at regular intervals checking whether any of the blogs it is subscribed to has new material and reports back with the running title and opening lines.

If more people would turn their homepages into weblogs, the frustrating job of checking (usually in vain) whether their pages has been updated could be left to the aggregator. For now, I’m using Rancheros’s NetNewsWire as my Mac OSX news
aggregator.

Okay, now it is time to make some final preparations for endyear, but tomorrow I’ll wake up to become a blogger

3 Comments