Skip to content →

Tag: OSX

Snow leopard + wordpress + latex problem

Ever since I’ve upgraded to Snow Leopard I’ve been having problems with the webserver.

At first there were the ‘obvious’ problems : mysql-connection lost and php-error message. These were swiftly dealt with using the excellent Snow Leopard, Apache, PHP, MySQL and WordPress! advice from ‘tady’.

Right now, access to this blog is extremely slow (and often impossible), certainly via the admin-page. The problem appears to be that most of my CPU is used by lots of pdfetex-processes owned by www. Hence the conjecture that it is a problem with either LaTeXRender or WP LaTeX.

Anyone experiencing a similar problem, or knowing a trick to resolve it? Takk.

Leave a Comment

math2.0-setup : mysql and php+

Last time I wondered whether a set-up like WordPress.com meets FaceBook with add-ons (such as wiki- and latex-support) might be a usable environment for people working in a specific arXiv-topic.

I’ve used WordPressMU and BuddyPress to create such an embryonal environment. At first I thought I’d extend it a bit before going online but I fail to have the energy right now so I might as well make the link available. If you are into math.QA and/or math.RA you are invited to join the experiment. But, please use this site gently as I’ll have to drop it otherwise.

I’ve no desire to maintain this site indefinitely but would welcome others to set up something similar. For this reason I’ll write a couple of posts explaining how you can build it yourself when you’d have a free afternoon and a spare Mac around. Each post should not take you longer than 1 hour. Today, we’ll provide the boring but essential basics : we must get a MySQL-server and a WebServer running. Next time, I’ll take you through the WordPressMU (MU for multi-users) and BuddyPress installation. After that, we’ll add extra functionality.

We will start from a vanilla 10.5.6 installation. We will often need to edit files, so we’d better grab a good, free  texteditor : TextWrangler, drag it to Applications and place it in the Dock. We’ll also type in commands so we want the TerminalApp (to be found in Applcations/Utilities) in the Dock. SystemPreferences and Safari are already in the Dock and as we will need these tools a lot we might rearrange the Dock to look like


From left to right : the Finder, Terminal, Safari, TextWrangler and System Preferences. From now on we will mean by ‘Open …’ that you click on the ‘…’ icon. In the end we want our computer to become a web-server, so we don’t want it to go to sleep. Open SystemPreferences and look for the ‘Energy Saver’-icon, click on the ‘Show details’ button and set the ‘Put the computer to sleep when it is inactive for:’ to Never and unmark the ‘Put the hard disk(s) to sleep when possible’ at the bottom.

We will need to start or stop the WebServer so here’s how that’s done : open SystemPreferences and look for the ‘Sharing’-icon. Marking the ‘Web Sharing’ option is equivalent to starting your webserver (you can verify this by opening Safari and pointing it to http://localhost/ and you should see the default Apache-screen), unmarking it stops the webserver (check this by repeating the previous, now you should get a ‘Safari can’t connect to the server’ message).

All of this was probably trivial to you so let’s do something a bit more advanced : setting up a database-server. OSX doesn’t come with MySql, so we need to download and install it.

MySQL :

Get the latest version : choose the Mac OS X 10.5 (x86)-package and download it (they ask you to register but you can bypass this by clicking on the ‘No thanks, just take me to the downloads’-link). It is a 55.3 Mb file so this may take a couple of minutes. If all goes well this window should pop-up
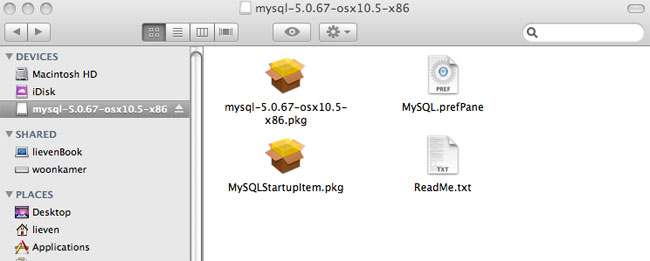


Click on the mysql-5.0.67-osx10.5-x86.pkg icon and follow the instruction (defaults suffice, you’ll be asked to give your sudo password and in all it will take less than a minute). Repeat this procedure with MySQLStartupItem.pkg. Done!

To verify it, Open Terminal and type this to the prompt

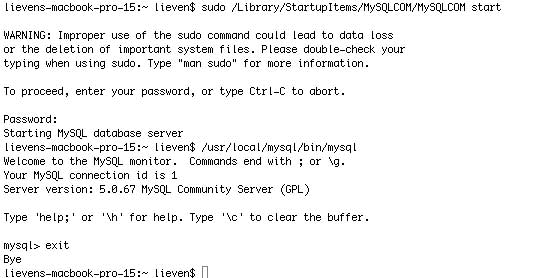
sudo /Library/StartupItems/MySQLCOM/MySQLCOM start

You’ll get a scary warning message but type in your sudo-password and the Mysql-server will start. You can access it by typing

/usr/local/mysql/bin/mysql

and type exit to the mysql-prompt to leave.
In all, your interaction with the terminal should look something like this


Clearly, you do not want to type all of this every time, so we will add the mysql-location to our ‘PATH’. To do this, open TextWrangler and add this line to the blank document

export PATH=$PATH:/usr/local/mysql/bin

and save the file as .profile in your home-directory (the one with the ‘House’-icon, usually given your name). You will get a warning that .-files are reserved but go ahead anyway by clicking the use . – button). Now, open Terminal and type this

source ~./profile
echo $PATH

if all went well you should now see the mysql-location at the end of your path. From now on you’ll only have to type

mysql

to the terminal-prompt to open MySql. At the moment the root-user of your mysql has no password which isnt safe so we’d better set one. Open terminal and type

mysqladmin -u root password NEWPASSWORD

where, of course, you replace NEWPASSWORD with your choice (use only letters and numbers). From now on you can access your mysql-server by opening Terminal and typing

mysql -u root -p

and giving your password. Okay, so we’ve established our first goal, we have a working Mysql. Take a break if you need one.

better PHP

Mac 10.5 comes equipped with php5 but unfortunately it isn’t quite up to what we need. So, we need to install a better one and tell the mysql-server and the webserver to use the new one instead of the standard one.

Open Safari and grab the better php-version by going to

http://www2.entropy.ch/download/php5-5.2.5-6-beta.tar.gz

It is a 85.2 Mb file, so have a bit of patience. The file gets unzipped automatically and downloaded in the Downloads-directory. Open Finder and go there. At the moment your Downloads-directory will look like
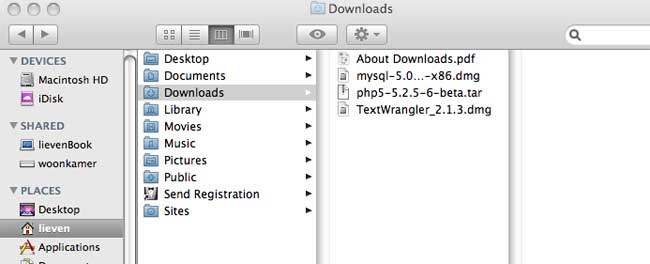


Doubleclick on the php5-5.2.5-6-beta.tar file and a new directory will be created called php5. We will now move this directory and lay some symbolic links. Open a new Terminal window and type the following commands (and provide your sudo-password when asked)

cd Downloads
sudo mv php5 /usr/local
sudo ln -sf /usr/local/php5/entropy-php.conf /etc/apache2/other/+entropy-php.conf
sudo mkdir /var/mysql
sudo ln -s /tmp/mysql.sock /var/mysql/mysql.sock

Next, we have to tell the webserver to use this new php-version instead of the old one. This information is contained in the apache-configuration file : httpd.conf. Open TextWrangler and under ‘File’ choose the option ‘Open File by Name’. Type /etc/apache2/httpd.conf in the field that appears. The file will now appear in the main window. Under ‘Search’ choose the ‘Go to Line’ option and fill in 114 and hit the Go To button. The follwing line should now be highlighted

#LoadModule php5_module libexec/apache2/libphp5.so

immediately under it add the following line (TextWrangler will tell you that the file is owned by root and ask you whether you want to open it, click yes and make the changes)

LoadModule php5_module local/php5/libphp5.so

(observe that line 114 is commented out, that is, starts with a #, whereas your added line is not).
Save the file (Textwrangler will ask you to provide the sudo-password).

Next, we will have to tell php to communicate with the mysql-server. Again, open TextWrangler, under ‘File’ choose ‘Open File by Name’ and type in /usr/local/php5/lib/php.ini-recommended. When the file appears, under ‘Search’ choose ‘Go to Line’ and type in 810. It will read

mysql.default_socket =

Change it as follows (that is, add to it)

mysql.default_socket = /var/mysql/mysql.sock

and now choose under ‘File’ the ‘Save as…’ option. In the window change php.ini-recommended to php.ini and click Save. Done!

Testing…

Restart your webserver. Recall that this means: open SystemPreferences, choose ‘Sharing’, unmark ‘Web Server’, wait 5 seconds and then mark it again.

Open TextWranger, make a new Text document containing just one line (remove the white space between the ?-signs and the brackets) :

< ?php phpinfo() ? >

Choose ‘File’ and ‘Save as…’ and in the window that appears navigate to YourHardDisk/Library/WebServer/Documents, name the file ‘test.php’ and click the ‘Save’ button
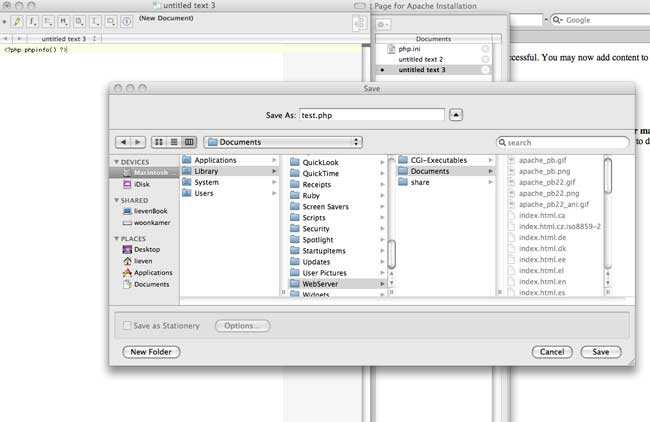


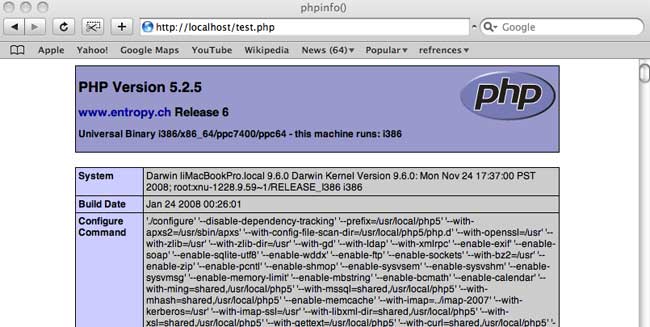
Finally, open Safari and point it to http://localhost/test.php. Cross your fingers and if you get a screen like the one below treat yourself to something nice!


Leave a Comment

yet another math2.0 proposal

At present, some interesting experiments are going on exploring the potential of web 2.0 for mathematical research, that is, setting up a usable math 2.0 – environment.

The starting point is that math 2.0 should be something like blogs+extras. Most mathematicians are not that interested in the latest ICT-tools, but at least they are slowly getting used to reading blogs, so we should stick to this medium and try to enhance it for online-research.

Michael Nielsen has written a couple of posts on this : an after-dinner talk about doing science online aiming at a mathematics audience, building on an essay on the future of science.

Both posts were influential to Tim Gowers‘ dream of massively collaborative mathematics. He took an interesting problem, laid down a set of 12 rules-of-conduct and invited everyone to contribute. The project is still gaining momentum and Terry Tao is also posting about it on his blog.

Michael Nielsen compared Gowers’ approach to long established practice in the open-source software community.

Another interesting experiment is nLab, a knowledge-wiki set up by the reader-community of the n-category cafe. They describe it as : “In other words: this place is like the library, or alchemist’s laboratory, in the back room of the n-Category Café. You come here to work and go there to chat.
We are hoping to create here a space for presentation and archival storage of collaborative work of encyclopedic, didactic, expositional, but also original nature. This will include, but not be limited to, the subjects being discussed every day in the n-Café.”

Both experiments are working great, aided by the authority-status of the blogger, resp. the popularity of the blog, within the research topic. But, what about topics failing to have a blogger or blog of similar status? Should we all drop our current research-interest and convert to either combinatorics or higher-categories?

History taught us in case of failing authority we’d better settle for ‘manageable anarchy’. So, here’s my math2.0-anarchy-allowed-proposal :

  • per research-topic (say, an arXiv-topic) we’ll set up a seperate online-reasearch-environment
  • anyone interested in that topic is allowed to register and fill-out a profile linking to her list of publications, describe his research interests, her ongoing projects and other trivia
  • some may want to start a blog within the environment or join an already existing one, and should be allowed to do so
  • some may opt just to read blog posts and occasionally comment, and again, should be allowed to do so
  • some may want to set up a research-group to solve a specific problem. they may choose to do this in the open, or as a covert-operation, taking on new members only by invitation
  • some may use the environment mainly for networking or chatting-up with their friends
  • some research-groups may want to start a group-blog or knowledge-wiki to archive their finds
  • surely we’ll be not discussing math in ASCII but in latex
  • anyone will be able to follow specific sub-projects via RSS-feeds
  • anyone can see site-wide activity online, see who’s currently there and chat if they feel the need
  • anyone can do whatever sensible web2.0-thing there is I forgot by age and hence by ignorance

If this seems like a tall order to satisfy, a bit of research will show that we live at the fortunate moment in time when all the basic ingredient are there, freely available, to do just that!

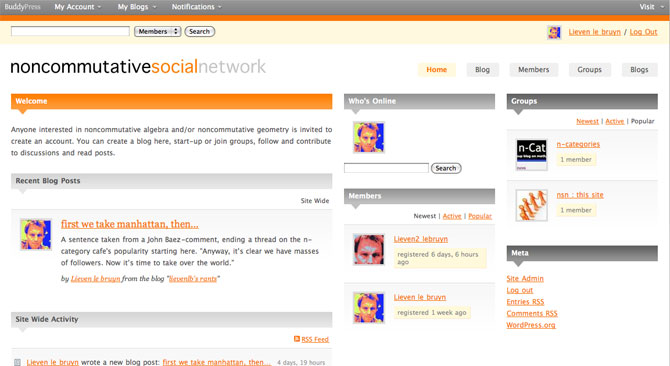
Over the last weeks I’ve wasted too many hours googling for help, reading-up different fora to get it all working, but … somehow succeeded. Here’s a screen-shot of my very-own NSN (for : noncommutative-social-network) :


Please allow me a few more days to tidy things up and then I’ll make the link available so that anyone interested can experiment with it.

But then, I’ve no desire to spend my days web-mastering such a site. Perhaps some of you would like to take this on, provided you’d get it on a silver plate? (that is, without having to spend too much time setting it up).

So. I’ll run a series of posts explaining how to “set-up your own math2.0 environment”. I’m not aiming at the internet-savvy ones (they’ll probably do it a lot more efficiently), but at people like myself, who are interested to investigate web-based possibilities, but need to be told where to find the very basics, such as the location of their httpd.conf file or their php.ini and such.

I’ve zeroed my MacBookPro, re-installed OSX 10.5 from scratch, upgraded it to current 10.5.6 but no extras (say, vanilla 10.5.6). And I’ll guide you from there, in all gory details, with plenty of screen-shots as I would have liked to find them when I tried to set this up.

One Comment

sporadic simple games

About a year ago I did a series of posts on games associated to the Mathieu sporadic group $M_{12} $, starting with a post on Conway’s puzzle M(13), and, continuing with a discussion of mathematical blackjack. The idea at the time was to write a book for a general audience, as discussed at the start of the M(13)-post, ending with a series of new challenging mathematical games. I asked : “What kind of puzzles should we promote for mathematical thinking to have a fighting chance to survive in the near future?”

Now, Scientific American has (no doubt independently) taken up this lead. Their July 2008 issue features the article Rubik’s Cube Inspired Puzzles Demonstrate Math’s “Simple Groups” written by Igor Kriz and Paul Siegel.

By far the nicest thing about this article is that it comes with three online games based on the sporadic simple groups, the Mathieu groups $M_{12} $, $M_{24} $ and the Conway group $.0 $.

the M(12) game

Scrambles to an arbitrary permutation in $M_{12} $ and need to use the two generators $INVERT=(1,12)(2,11)(3,10)(4,9)(5,8)(6,7) $ and $MERGE=(2,12,7,4,11,6,10,8,9,5,3) $ to return to starting position.


Here is the help-screen :


They promise the solution by july 27th, but a few-line GAP-program cracks the puzzle instantly.

the M(24) game

Similar in nature, again using two generators of $M_{24} $. GAP-solution as before.


This time, they offer this help-screen :


the .0 game

Their most original game is based on Conway’s $.0 $ (dotto) group. Unfortunately, they offer only a Windows-executable version, so I had to install Bootcamp and struggle a bit with taking screenshots on a MacBook to show you the game’s starting position :


Dotto:

Dotto, our final puzzle, represents the Conway group Co0, published in 1968 by mathematician John H. Conway of Princeton University. Co0 contains the sporadic simple group Co1 and has exactly twice as many members as Co1. Conway is too modest to name Co0 after himself, so he denotes the group “.0” (hence the pronunciation “dotto”).

In Dotto, there are four moves. This puzzle includes the M24 puzzle. Look at the yellow/blue row in the bottom. This is, in fact, M24, but the numbers are arranged in a row instead of a circle. The R move is the “circle rotation to the right”: the column above the number 0 stays put, but the column above the number 1 moves to the column over the number 2 etc. up to the column over the number 23, which moves to the column over the number 1. You may also click on a column number and then on another column number in the bottom row, and the “circle rotation” moving the first column to the second occurs. The M move is the switch, in each group of 4 columns separated by vertical lines (called tetrads) the “yellow” columns switch and the “blue” columns switch. The sign change move (S) changes signs of the first 8 columns (first two tetrads). The tetrad move (T) is the most complicated: Subtract in each row from each tetrad 1/2 times the sum of the numbers in that tetrad. Then in addition to that, reverse the signs of the columns in the first tetrad.

Strategy hints: Notice that the sum of squares of the numbers in each row doesn’t change. (This sum of squares is 64 in the first row, 32 in every other row.) If you manage to get an “8”in the first row, you have almost reduced the game to M24 except those signs. To have the original position, signs of all numbers on the diagonal must be +. Hint on signs: if the only thing wrong are signs on the diagonal, and only 8 signs are wrong, those 8 columns can be moved to the first 8 columns by using only the M24 moves (M,R).

Leave a Comment

iTouch warwalking

Four years ago I had a brief fling with wardriving. It went only as far as getting Ethereal to crack the security of our house-network. I simply couldn’t picture myself walking around the neighborhood with my laptop under my arm… However, jogging around with an iPod will attract far less attention.

Starting an iTouch in a network-rich environment you will be asked which network you want to connect to (see for example this wardriving video). However, if you need more information on the networks, there is a port of the OSX-tool iStumbler for the iPhone/iTouch : Stumbler (available also from the Install.app under Network). This morning I flipped open my iTouch in a generic street near the University and was surrounded by 12 wireless networks, 6 of them wide open…

One may then ask : what about less innocent wardriving tools such as Kismet or Ethereal itself? The problem with porting those seems to be that no-one knows whether the iTouch wireless driver can be put into ‘promiscuous mode’ (see for example this thread).

Once you have collected open networks at your favourite places or have passwords to closed networks, it would be nice if the iTouch would auto-detect these and connect to them without you having to remember the particular name or having to type in username/password combinations. Surprisingly, this is possible thanks to the people at devicescape.com. Create a free login, then get Devicescape Connect (available under Network) run it and write down the pincode you are given and follow the instructions to complete the installation. You can then edit your Wi-Fi list of desired hotspot or personal networks, together with all login-data. There is a nice TidBit article describing devicescape in full detail.

One Comment

first things first : jailbreak

You may have surmised it from reading this post : Santa brought me an iPod Touch! (( or rather : Santa brought PD2 an iTouch and knowing his jealous nature ordered one for him as well… )) Ive used an iPodClassic to transfer huge files between home (MacBook) and office (iMac) as well as for backup purposes. I wanted to find out what new tricks this trio could play now that iPod can go online. Major disillusion : one cannot even enable DiskUse via iTunes at the moment. (( rumours are that Apple will enable DiskUse in firmware 1.1.3, coming up next februari… )) What’s wrong with Apple? They make this marvelous piece of technology and then do a Golem-act preventing anyone else from using their precious thing. I understand their business plan, but soon it will make more sense to buy Apple shares than to buy their computers…

Enters the 13-year old AriX writing iJailbreak to free the iTouch. So, before you put any music or video on your pod (( and frankly there’s not much else Apple allows you to put on it )), dare to void the guarantee and risk your new gadget being bricked (( but, if I can pull if off you certainly can.. )) by Jailbreaking it! There are plenty of good guides around, both for Windows and Mac, but most of them can be slightly improved. I’ve followed Let’s Jailbreak the iPod touch 1.1.2 with OS X but shortened his downgrade to 1.1.1 procedure which is the first (and hardest) step in the whole procedure. The moment PD2 will see I can use Maps and Weather she’ll want me to jailbreak her iTouch too, so mainly for myself I list here the procedure before I forget it.

Jailbreak 1.1.2 with Leopard on Intel, use at your own risk.

Get a decent browser such as Firefox or Flock (to prevent the download to selfexpand, so when given the choice to open it with iTunes or save it to Disk, save!) and download Firmware1.1.1 and place it somewhere (why not create a Folder called Jailbreak).

Connect your iTouch and fire up iTunes and select your iTouch in the left column. Hold down the option key and click in the summary pane the Check for Update button. This will open a Finder window allowing you to navigate to the downloaded file and open it. The iTouch will downgrade itself to 1.1.1. Just wait until it reappears in iTunes and disconnect it.

With Safari on the iTouch go to jailbreakme.com and scroll to the bottom and click on the InstallAppSnap button. Let it do its magic and afterwards there is a new Installer-icon on your ‘springboard’ (the opening iTouch page). Open it and refrain from installing all the goodies now, just scroll down to Tweaks (1.1.1) open and select “OktoPrep” and install it (button top right-hand corner).

Connect iTouch to mac, start iTunes and select your iTouch. Click on the update button and now iTunes will bring you back to Firmware 1.1.2. After finishing wait until your iPod reappears in the left column. (Do not panic if you fail to see the Installer-icon on springboard, it will reappear later on). Then, close iTunes (your iPod stays connected via USB to the Mac). Use any browser on your mac to download Jailbreak 1.1.2 and place it somewhere.

Find the Java-applet jailbreak.jar in the folder and double click it. Again, magical things are happening ending with the iTouch booting up several times and you performed the Jailbreak.

Let’s open up the iTouch to the world

So, what was the point of all this? We still have no DiskUse enabled nor can we speak to the iTouch directly. But all of this is going to change rapidly. Let’s make it available to our DeskTop.

With “install package xxx” I will mean : fire up Installer from your springboard, donate as quickly as you can to the guys making this available, then click on the “install” icon lower-left. This will open up lists of packages, scroll down to package xxx, click on it to read more about it, and then hit the “install” button top-right. That’s it. (If you ever want to unistall a package, do the same process now starting from the “uninstall” icon lower-right).

Install first BSD Subsystem (under System packages) and the AFPd (under Network). This will turn your iTouch into an AFP-server. By clicking on its icon in the Springboard you can turn the server on and off (remember to turn it off when not needed!) and turn on Broadcast if you want the iTouch to show up on your Desktop (in the Leopard-Finder under ‘Shared’). You can now connect to the iTouch by clicking on its icon in the Finder and hitting connect. The default user/password combination for a Jailbroken iTouch are
root/alpine. Change this as soon as you figure out how to do it. ‘Alpine’ must be the most popular password right now… The AFPd-page also contains the Wi-Fi IP Address of the iTouch and you will need it soon, so write it down.

For we are going to connect via ssh and sftp to and from iTouch/Mac. Install the OpenSSH package (under System) and the Term-vt100 package (also under System). From the Mac to iTouch you can connect via something like

ssh root@10.0.1.197

(change the number to the IP-Address of the iTouch) and login with the alpine password. You’re in! Conversely, open up the Term-vt100 icon in the springboard which give you a genuine *nix-Terminal. You can connect via ssh to your mac provided you know its IP and your login. That’s all.

Btw. you can also use your favourite file-transport program (mine is Transmit to connect to and from your iTouch via SFTP. Right, now that the iTouch is under control we might as well give it a voice of his/her own.

Install Apache (under System) and PHP (under Development) and follow the instructions from the iTouch Fans Forum (you will need to register, but if you’re not an iTouch-fan there’s little point in you reading this post anyway) and you will have turned your iTouch into a PHP-enabled webserver! On the left is a screenshot of the proof via the php-info testpage.

Finally, we can turn the world upside down completely. Before all of this we had no way to get control of the iTouch, now we can use the iTouch to take control of all our Macs serving VNC (Leopard comes with it, enable the password in System Preferences/Sharing/Screen Sharing/Computer Settings and you’re under iTouch control). To pull this off, just install the VNsea package (under Network). It really works well!

Oh, you’re only here to install the iPhone Apps…

Well, that’s easy enough. Just follow the instructions of the Install and use iPhone Apps in iPod touch from the excellent blog by Rupert Gee. The most difficult part is to get hold of the iPhone Apps if you don’t own an iPhone… Well, I’m happy to provide you with this secret information

Leave a Comment

NeB on Leopard and iPhone

If you have an iPhone or iPod Touch and point your Safari browser to this blog you can now view it in optimised format, thanks to the iWPhone WordPress Plugin and Theme. I’ve only changed the CSS slightly to have the same greeny look-and-feel of the current redoable theme.

Upgrading a WordPress-blog running under Tiger (Mac OS 10.4) to Leopard produces a few anxiety moments. All of the standard tools (Apache, PHP and MySQL) seem no longer to work as before. For those of you who do not want to waste too much time over it, I’ll walk through the process.

After upgrading to Leopard you want to check whether your blog is still alive, so you fire up Safari and will be greeted by the message that Safari cannot find your server. Sure enough you forgot to start the WebServer in SystemPreferences/Sharing/Web Sharing. Having fixed this you will see the default Apache-screen because Leopard put these default-files in your webserver-root directory (/Library/WebServer/Documents). In case you installed your blog under a user account you will get a message that you enter forbidden territory, see below for the solution to that problem. Having removed all those index.html files (making sure NOT to delete the index.php of your blog) a more serious problem presents itself : you see the text-version of index.php meaning that PHP isnt working. You check the /etc/httpd/httpd.conf file and it still contains all the changes you made to it to get PHP running under Tiger, so what is going on?

Googling for something like ‘enabling PHP under Leopard’ you’ll discover that the configuration file used by the webserver is in a different location. It now resides at /private/etc/apache2/httpd.conf. You will have to remove the hash sign (#) at the beginning of line 114 so that it reads

LoadModule php5_module libexec/apache2/libphp5.so

Next, you have to create a php.ini file and change one line. The first thing is settled by the following Terminal-commands

cd /private/etc
sudo cp php.ini.default php.ini

and in the php.ini you have to modify line 305 so that it becomes (removing the latter part of the line)

error_reporting = E_ALL

Restarting the webserver enables PHP. If you need more details check out the article Enabling PHP and Apache in Leopard. However, you are not quite done yet. Your blog will now show the WordPress-page that something is wrong with your mysql-database. However, mysql seems to be running fine as you can check from the Terminal so PHP cannot find it.

To remedy this, you have to add the locations (after the = sign) in the follwing two lines of the php.ini file

mysql.default_socket = /private/tmp/mysql.sock
mysqli.default_socket = /private/tmp/mysql.sock

Restarting the webserver should resolve the problem. But then your blog can still choke on old PHP-code in one of the plugins you use. In my case I was using an ancient version of the PHP-Markdown plugin but after replacing it with the newest version NeB looked just like I left it with Tiger…

A final point : webpages stored in personal Sites-folders cannot be served by Apache2 and will produce a message that you have not enough privileges to view the page. To resolve this, type the following command from the Terminal

sudo cp /private/etc/httpd/users/*.conf /private/etc/Apache2/users

2 Comments

mathML and work ahead

It has
been a difficult design decision, but I’m going to replace the LaTeXRender WordPress
Plugin
for mathML as the
default TeX-interface for NeverEndingBooks. I will keep LaTeXRender on
standby as I may have to use exotic packages or commands that iTeX does
not deliver, but for most math-related posts, MathML will do the job
nicely (as the n-category
cafe
shows every day (or even more often)). Not that I stopped being
a dilettante but I’m going to do most of my writings (including
blog-posts) using Scrivener (more on this
another time) and Scrivener supports MultiMarkdown and allows exporting to LaTeX and XHTML (using MathML).

I could never have pulled this off in such a short time without Jacques Distler
more or less on constant stand-by (thanks Jacques!). Looking at the
times his emails were send I have no idea in which time zone he lives
(let alone sleeps…). So, here a walk-through the changes :

As
I’m on WP 2.0.5 I’ll start with Frederick’ post. He tells me I have to install first the itex2MML binary as
explained by
Jacques
but I find that there is more recent
material
and therefore download the most recent imath2MML-package
and follow the readme. There is a Mac OSX binary but it’s not clear
for what processor (PPC/Intel/Binary) but a quick mail to Jacques learns
me that it’s PPC which is fine by me but on the spot he puts a
universal binary online, so whatever your Mac is you can just download
the binary, copy it to /usr/local/bin and make sure its chmodded
755.

Back to Frederick’s post, download and install the plugin itexToMML.php in the usual way
(fortunately I spot just in time that I have to change one line saying
where my itex2MML binary is (in Frederick’s file it is NOT the default
location)). You can verify whether the plugin and itex2MML do what they
are supposed to do by typing a LaTeX-command in a post and save it. The
output will not produce the desired formula but have a look at the
source file and see whether there is some mathML code in it. If so,
fine! If not, go back and check everything.

If this works, it is
“merely” a problem of getting your mathML served. Frederick suggests
to unpack wordpress_mathML.zip in the wp-includes directory (but you
better make sure you have made a copy of the original class.php and
functions-formatting.php files. In the end I decided against this
approach (that is, to replace only the functions-formatting.php but NOT
the class.php file). If you have two or more themes you want to
maintain, it is probably better to change the headers (because this is
what we have to do to get mathML served) only in those themes which are
XML-sound. In my case, the Command Line Interface theme most certainly is NOT!!!).

Go to your
theme-files and look for the header.php (or similar) file and replace
the default header by the code in the addendum to
this post
within php-tags. If you can go to your blog-page then you
are in good shape and things should work well (apart possibly from
layout considerations, see below). Of course, in my case i was greeted
by ” XML “yellow screen of death” (as Jacques calls
it) and I was convinced I did something wrong, so I tried out several
useless things for a couple of hours before it dawned on me that the
reason might just be that my blog-files were not valid XHTML (and the
new headers are very demanding on serving only well-form XHTML). I had
to modify all changes I made to sidebars etc. as well as rewrite parts
of my first posts (I used to take a rather liberal view on writing
blog-posts, writing a mixture between Markdown and improvised HTML and
in the process was very lax about closing IMG-tags and the likes).
But after some time and numerous corrections to the files I got the
main-page up and running (and even had the mathML served as a readable
formula) apart from the fact that I barely recognized my own site.

I printed out source files of the page with and without changed
headers and couldn’t find a difference. So, it had to do with the
CSS-style files, but why on earth would the new headers be picky about
CSS? But as a last resort, after narrowing the search down to one
CSS-line, I asked Jacques whether he had an idea what went on. His reply
will be remembered for quite some time :

A fascinating
question. The answer is that it *is* following the CSS directive, but
in XHTML, ‘body’ is not what you think it is. ‘body’ is just big enough
to contain its content. It does not fill the viewport. ‘html’ fills the
viewport. The solution (a solution) is described in
http://golem.ph.utexas.edu/~distler/blog/archives/000203.html

Many hours later, I still haven’t got a clue what
this is all about, but I blindly followed the hint and surely all
problems vanished. In short, another day wasted in front of a
computer-screen.

At the moment I’m back to old headers and
will not be writing mathML for some time as I have the vast job ahead to
validate all my previous posts to XHTML-standards (if not you would see
more yellows screens of death than anything else. So, here’s the
strategy I’ll be taking in the weeks ahead (I’ll sleep on it tonight
so if any of you think there is a better way, reply quickly)

  • rewrite each and every post in proper MultiMarkdown using iTeX for
    the most common math and only resorting to LaTeXRender for exotic things
    (such as Sudoku, Chess, Dvonn) and run these posts through Markdown
    (to get basic HTML and all links in place).
  • download these
    files to the WP-database (so that in the CLI-interface you will be able
    to follow all links, but will read all iTeX as TeX-commands (as the
    command line intended after all).
  • in the process change all
    broken links to the default permalink-structure (with index.php?p=231 or
    so).

Clearly, this is a work that will take a couple of
weeks but it may be fun to reread these old posts and possibly add new
information about the subjects. When I’m making these changes, I’ll
use the new headers so if you are using a smart browser look out for the
yellow screens. When they happen, either use a dumb browser (such as
Safari) or go into CLI-interface mode where everything should still
work. I plan to start with the oldest posts as this seems more fun to
me.

One Comment

command line interface

Way
back in 1999 I read Neal Stephenson’s pamphlet In the Beginning ! Was the Command Line and
decided I should and would have Linux running on my clamshell iBook.
Needless to say this was (a) a foolish idea and (b) not entirely trivial
in those dark OS 9-days. Still, I somehow managed with the help op PPC Linux and was
proudly wearing their T-shirt (at least for a couple of weeks in early
2000). Fortunately, as a brief OS X
history
recalls, OS X was released March 24, 2001 and put an end to
my Linux-folly and I’m pretty certain even Neal Stephenson is on Mac OSX
these days.

Needless to say I couldn’t resist installing the
Wordpress CLI-theme
the moment I spotted it! A command line
interface to your blog! awesome! If you want to have a go at the
original version, take a look at Rod McFarland’s blog.
Just type ‘ls’ to the prompt and you’ll be hooked. Or you can have a
look at the command line interface of NeverEndingBooks by going to the
left sidebar and clicking CLI under the ‘Command Line Version’ header
(don’t be afraid you can always come back by clicking on the
GUI-interface over there). My design is black on a light-gray background
and is no where near as cool as the original theme but it was the only
quick way around some limitations of the CLI-theme.

The
CLI-theme operates as a front-end via a small interpreter which draws
the information directly from the WordPress-database. As a result you
loose the effect of all post-processing by plugins such as Markdown and LatexRender two of
the plugins I use most! I could still live with the idea that pure LaTeX
was served to a CLI-environment between tex-tags, but surely I didn’t
want to loose all my links! The quick (and extremely dirty) way around
it was to resubmit the relevant part of the HTML-source files of the
GUI-frontend posts to the WP-database. And to serve the same LaTeX-gifs
to the GUI and CLI interface I needed the backgound to be rather light
gray (taking #BDBDBD gray would have been much nicer wrt. the cool
rasterized grayed-images but then some of the more recent LaTeX-gifs
became partially unreadable). Oh, and in the process I had to update the
permalink structure, thereby wrecking allmost all internal
reference-links (but I’ll sort them out soon, I promise).

So, a
lot of work for a rather meagre result. What do I like about the
CLI-interface (apart from old time nostalgia)? I really like the
searching facility. Just type ‘search yourword’ to the prompt and it
will give you all posts containing that word (much quicker than in the
GUI-interface) and if you remember at least one word from a post-title,
feeding it to the prompt will give you the entire post (or a list of
posts if the same word appears in different posts). Try out typing
‘Perelman’ to see what I mean. Besides, bots don’t seem to know what to
do with the CLI-interface so for the few days I had this theme as my
default theme I was alone on NeverEndingBooks mast of the time (which
helped a lot having to change that many posts). So, whenever I want to
have the site to myself I’ll just change the default theme from now
on.

Still, I did put back the old GUI as default because the
CLI-theme still has a few drawbacks. Such as, it is impossible to write
a sizable comment (not that too many of you do this, but anyway) and
some other quirks. Still Rod McFarland is working on a version 2 (and
even set up a google-group for
those who want to code along, and maybe I’ll join the effort) which
promises a great improvement and I’m rather confident that by version
3.14 it will be in a state that I’ll have the CLI-interface as my
default. Until then, I’ll keep up the two front-ends and allow you to
toggle as you like (your browser will remember your preference).

I realize most of you are youngsters and not of my cpu2
generation so have a hard time imagining how exiting a command line
prompt is. Fortunately, Neal Stephenson has made the full text of “In
the beginning ! was the command line” available as a
free download. Print it out and enjoy!

Leave a Comment

minute changes

These
lazy days between christmas and new-year’s eve are ideal to do finally
those things one would like to postpone indefinitely. Here is a list of
the tiny changes made to this blog : At last, an upgrade from WordPress version
2.0 to 2.0.5
. Something I always defer because of the warnings to
back up databases and all changed files and preferences (and as I have
these sporadic periods of changing the PHP-code to my taste, I tend to
forget the changes I’ve made). Still, things went smoothly as far as I
can detect, the only problem I encountered was following the
instructions to the letter, such as

Special Exception:
the wp-content/cache folder should be deleted.

when what
they really mean is that one should only delete the
contents of the cache-directory. So, I had a 5-second
scare starting up the homepage and being greated with an error message
saying something to the effect that WP couldn’t write to this directory.
Apart from security reasons, this upgrade was necessary to install
some WordPress Plugins.
Top of my wish-list being RS-
Discuss
.

RS Discuss is a brand new, tiny, lightweight
wordpress forum plugin that is entirely self-contained and integrates
tightly and seamlessly into your existing WordPress website. Despite its
size, it’s got everything that makes a forum a useful tool:
Full
integration with WordPress’ own user system
Multiple forum
setup
RSS feeds for forums, topics and user activity to keep
track
Search capabilities
Sidebar widget integration
Totally customisable, including different setups for different themes
Fully featured mdoerator controls including pinning and locking
topics
Clean uninstall if you don’t like it :)

So, if
you like to make your own contribution to this site (apart from
commenting), the forums (note to old schoolmates : i know it should
really be fora…) are open to all from the top menu :
forum
. At present I’ve only set up a forum dedicated to discussions
on noncommutative algebra/geometry but if you like other discussions,
you will find a way to let me know. Below each post you will now
find a collection of colourful logos. They enable someone who registered
to one of the may social-bookmarking sites to add the post to their
bookmarks. Here, I used the Sociable
plugin
. Last year I had a brief period experimenting with CiteULike
(see
this post
) and I intend to explore some of these bookmarking
systems further over the coming months. I’ve moved My Online Publication Page
over to this blog using the bib2html
plugin
. It is now avalable from the top menu
: biblio
. Every publication has its own BibTeX-popup link as well as
a link to the full PDF-file of the preprint version of the paper or book
(which may differ slightly from the published version). This page will
soon replace the older MOPP-page. I’ve moved the Archives of this
blog to the top menu :
archive
using the Smart Archives
Plugin
which gives a much better way to read though the past of
NeverEndingBooks. Actually getting this plugin to work did cost me some
time and (security)-worries, but these are solved, I hope. I you cannot
get it to work under WP-2.0.5, contact me and I’ll hopefully still
remember what I did. The default Calendar is replaced by an iCal-subscribable
calendar using the Event Calendar
Plugin
. So far, I haven’t added upcoming events yet, but it seemed
like a good thing to have when our masterclass-noncommutative geometry
starts next semester. Note to Self : Event Calendar is incompatible with
the Sociable-plugin, so deactivate it when you want to add a new event.
And then there are some totally useless plugins which I just couldnt
resist to install. Such as the mystatus plugin
which offers an easy way to let you know what keeps me bizzy these days
(you will find it in the left-hand sidebar) or the GeoPress
plugin
which enables me to add google-maps to whatever post I like.
For instance, as you may have guessed, I wrote this post from our home
and as google-maps of Antwerp have improved drasticly, you can zoom in
to my environment to any level of detail you feel appropriate…

INSERT_MAP

Added : this map seems to work with
Firefox, Flock and Camino under MacOSX but not with Safari. If you
happen to know why, please let me know.

Leave a Comment