Skip to content →

Tag: jailbreak

iTouch as network sniffer

In the iTouch warwalking post I was considering trying to gain access to closed networks for innocent purposes such as checking mail, rather than stealing secret passwords from people allowing you free access to their wireless network, but still, I should have thought of the following possibility

Here’s a walk-through :

  • type the following command into your iTouch Terminal.app (assuming you’ve installed the BSD subsystem) :

tcpdump -v -s 65535 -w log.txt

  • once you’ve collected enough packets, cancel the command (ctrl c), AFPd the file from the iTouch to your Mac and open it with Wireshark (this is the most convenient way to install binaries under Leopard as well as an updated version of X11. For other platforms, or source code, see here)

  • do whatever black magic you feel you have to perform using Wireshark (the new name for Ethereal) or other password crackers

2 Comments

quick iTouch links

MacBookAir? Is this really the best Apple could come up with? A laptop you can slide under the door or put in an envelop? Yeez… Probably the hot-air-book is about as thick as an iTouch. The first thing I did was to buy a leather case to protect the vulnerable thing, making it as thick as a first generation iPod… (needless to say, when my MacBookPro breaks down, ill replace it with a MacBookAir, clearly!)

Ranting about MacWorlds : Wired has a great article on last year’s event. Steve Job’s iPhone presentation is something that will be part of the collective memory when it comes to 2007-recollections. Few people will have realized that the Apple-team didnt have a working prototype a few weeks before… Here’s The Untold Story: How the iPhone Blew Up the Wireless Industry. A good read!

If you plug in your jailbroken iTouch, you will be asked wether you want to upgrade to 1.1.3, something we all feared for a long time and so it takes just nanoseconds to hit the cancel-button. But, there is good news! Rupert Gee reports that you can downgrade to 1.1.1 and redo jailbreak. I won’t try it for some time, but still…

In the unlikely event that you come here being a mathematician, here’s what I did with my iTouch today. Ive downloaded the Connes-Marcolli talks on Renormalization and Motives part 1, part 2, part 3, part 4, part 5, part 6, part 7 and part 8 at work. They are in mp4-format so you can load them into iTunes and onto your iTouch!!! Weather is not favorable for outdoor-cycling at the moment, so I used the home-trainer, put the iTouch in front of me and, boy, was I educated…

Leave a Comment

top iTouch hacks

So, you did jailbreak your iTouch and did install some fun or useful stuff via the Install.app … but then, suddenly, the next program on your wish-list fails to install ??!! I know you hate to do drastic things to your iTouch, but sooner or later you’ll have to do it, so why not NOW?

Move the Applications Folder

The problem is that there are two disk partitions (a small one, meant only to host the apple-software and a large one to contain all your music, videos and stuff) and Install.app installs programs in the /Apllications folder on the smaller partition. So, we want to move it to the other partition using a symbolic link trick (as in the wiki-hack post). Here a walkthrough, more details can be found on Koos Kasper’s site.

  • Have BSDsubsystem and OpenSSH installed, so that you can ssh into the iTouch.
  • verify that the second line of the /etc/fstab file reads as below (or edit it if necessary, in my case it was already ok, perhaps this is done during jailbreak?) and reboot the iTouch (if you had to change it)

/dev/disk0s2 /private/var hfs rw 0 2

  • ssh into the iTouch and type in the following commands (to move the folder and make the symbolic link)

cd /
cp -pr Applications /var/root
mv Applications Applications.old
ln -s private/var/root/Applications /Applications

  • reboot the iTouch, ssh into it and remove the old Application-folder to free space

cd /
rm -rf Applications.old

From now on, all (most) new programs are installed on the larger partition. If you reinstall the OpenSSH application (as suggested) make sure to remove on your computer the old key for iTouch.

Stream your Music!

I use the iTouch to read my mail, to read RSS feeds, to administer this blog, to VNC to the home-server and when needed to ssh into the computer at work (running this blog) to restart the apache server. Unless I have to write a lot, there is no need to fire up a computer… But, when someone has a Mac running, I would like to be able to stream the music on my iTouch to hear it loudly. Here’s the procedure, via Rupert Gee’s blog :

  • Have the Auto-Lock set to “Never” in Settings/General
  • Install the UIctl applications (under Utilities)
  • Add a source to Install.app (click on Sources-button lower-right, Edit upper-right and then Add upper-left) http://home.mike.tl/iphone
  • Relaunch Install.app and install FireFlyMediaServer (under Multimedia).
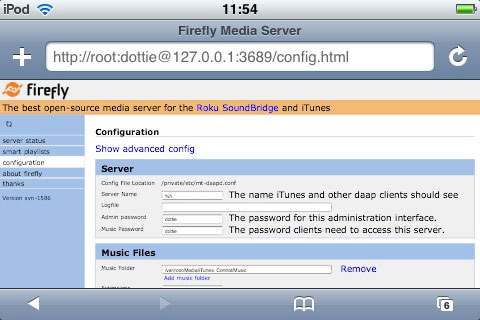
  • Write down the address given during installation to change your password and monitor the Firefly-server (the default root password is ‘dottie’ and so the address should be

http://root:dottie@127.0.0.1:3689

  • Open up UIctl and scoll down to a line saying “org.fireflymediaserver.mt-daapd” and tap on it. Tap on “load-w” and then on “Do It”
  • Now, at the Mac your iTouch should be vusible under Shared in iTunes, click on it and give the password and your music is available!

2 Comments

Wiki on iTouch

I’ve reduced the springboard of my jailbroken iTouch to a minimalistic Dock consisting only of the iPhone Mail.app to read and write mails properly (as opposed to having to use webmail on an unbroken iTouch), an RSS-reader to watch other math-blogs and the arXiv (via Install.app under Productivity/MobileRSS), the Safari webbrowser and a Finder (via Install.app under Productivity/MobileFinder) to launch all other programs, when needed.

To achieve this effect, install (as in the jailbreak-post) all these apps as well as Customize.app (under Utilities). This allows you to change the icon order on your springboard and dock as well as to toggle the visibility of these icons. Just make sure to have either Finder or Customize visible at all times or it will be difficult to get at the invisible apps (an alternative is to install something called Sunburst).

While the iTouch is great to read, it is harder to type a lot of text into it. Whence the idea of running a Wiki on it (now that we have PHP enabled Apache) and use another computer to create the wiki-pages. For example think of a small database of weblinks with descriptions. Rather than bookmark them one by one in Safari, make wiki-pages for them and use the Search function to get the desired link.

The first problem is that Wikis take a lot of space and you would like to have it installed under /Library/WebServer/Documents to view it with your inbuild Safari browser by typing something like http://localhost/wiki. To see the problem with this, ssh into your iTouch and issue a df command. You will get something like

# df
Filesystem           1K-blocks      Used Available Use% Mounted on
/dev/disk0s1            307200    297188      6940  98% /
devfs                       15        15         0 100% /dev
/dev/disk0s2          15551928    517904  15034024   4% /private/var

That is, you’ve used up almost all disk space of the partition on which the /Library/WebServer/Documents folder resides. So, we first need to move it to the other partition under /private/var, so why not create a Documents-folder under the root-homefolder and link to it?

cd /Library/WebServer
mv Documents /private/var/root/
ln -s /private/var/root/Documents Documents

Check it with http://localhost/ and you should still see your default Apache-page (though it now comes from another location). The next step is to find a PHP-Wiki hat works on the iTouch and doesn’t require a Mysql-database. I’ve tried at least ten without success and then I turned to the Wiki Engines Page and found QWikiWiki which does seem to work. So download it, rename the folder to something you like such as ‘qwiki’ and upload via SFTP to the /var/root/Documents folder of your iTouch and chmod it recursively to 777. If you ever need to change some of the PHP-variables, copy the php.ini from you mac over to the /opt/iphone/bin folder of the iTouch.

Finally, use a browser on your other computer to access the install file of Qwiki on the iTouch. For example, if the IP of iTouch is 10.0.1.197 then type

http://10.0.1.197/qwiki/install.php

and follow the online instructions. A few moments later you can type in your first wiki-page!

Some things still need to be done like optimizing the CSS for iTouch while serving the normal CSS for usual computers, but that’ll have to wait…

4 Comments

first things first : jailbreak

You may have surmised it from reading this post : Santa brought me an iPod Touch! (( or rather : Santa brought PD2 an iTouch and knowing his jealous nature ordered one for him as well… )) Ive used an iPodClassic to transfer huge files between home (MacBook) and office (iMac) as well as for backup purposes. I wanted to find out what new tricks this trio could play now that iPod can go online. Major disillusion : one cannot even enable DiskUse via iTunes at the moment. (( rumours are that Apple will enable DiskUse in firmware 1.1.3, coming up next februari… )) What’s wrong with Apple? They make this marvelous piece of technology and then do a Golem-act preventing anyone else from using their precious thing. I understand their business plan, but soon it will make more sense to buy Apple shares than to buy their computers…

Enters the 13-year old AriX writing iJailbreak to free the iTouch. So, before you put any music or video on your pod (( and frankly there’s not much else Apple allows you to put on it )), dare to void the guarantee and risk your new gadget being bricked (( but, if I can pull if off you certainly can.. )) by Jailbreaking it! There are plenty of good guides around, both for Windows and Mac, but most of them can be slightly improved. I’ve followed Let’s Jailbreak the iPod touch 1.1.2 with OS X but shortened his downgrade to 1.1.1 procedure which is the first (and hardest) step in the whole procedure. The moment PD2 will see I can use Maps and Weather she’ll want me to jailbreak her iTouch too, so mainly for myself I list here the procedure before I forget it.

Jailbreak 1.1.2 with Leopard on Intel, use at your own risk.

Get a decent browser such as Firefox or Flock (to prevent the download to selfexpand, so when given the choice to open it with iTunes or save it to Disk, save!) and download Firmware1.1.1 and place it somewhere (why not create a Folder called Jailbreak).

Connect your iTouch and fire up iTunes and select your iTouch in the left column. Hold down the option key and click in the summary pane the Check for Update button. This will open a Finder window allowing you to navigate to the downloaded file and open it. The iTouch will downgrade itself to 1.1.1. Just wait until it reappears in iTunes and disconnect it.

With Safari on the iTouch go to jailbreakme.com and scroll to the bottom and click on the InstallAppSnap button. Let it do its magic and afterwards there is a new Installer-icon on your ‘springboard’ (the opening iTouch page). Open it and refrain from installing all the goodies now, just scroll down to Tweaks (1.1.1) open and select “OktoPrep” and install it (button top right-hand corner).

Connect iTouch to mac, start iTunes and select your iTouch. Click on the update button and now iTunes will bring you back to Firmware 1.1.2. After finishing wait until your iPod reappears in the left column. (Do not panic if you fail to see the Installer-icon on springboard, it will reappear later on). Then, close iTunes (your iPod stays connected via USB to the Mac). Use any browser on your mac to download Jailbreak 1.1.2 and place it somewhere.

Find the Java-applet jailbreak.jar in the folder and double click it. Again, magical things are happening ending with the iTouch booting up several times and you performed the Jailbreak.

Let’s open up the iTouch to the world

So, what was the point of all this? We still have no DiskUse enabled nor can we speak to the iTouch directly. But all of this is going to change rapidly. Let’s make it available to our DeskTop.

With “install package xxx” I will mean : fire up Installer from your springboard, donate as quickly as you can to the guys making this available, then click on the “install” icon lower-left. This will open up lists of packages, scroll down to package xxx, click on it to read more about it, and then hit the “install” button top-right. That’s it. (If you ever want to unistall a package, do the same process now starting from the “uninstall” icon lower-right).

Install first BSD Subsystem (under System packages) and the AFPd (under Network). This will turn your iTouch into an AFP-server. By clicking on its icon in the Springboard you can turn the server on and off (remember to turn it off when not needed!) and turn on Broadcast if you want the iTouch to show up on your Desktop (in the Leopard-Finder under ‘Shared’). You can now connect to the iTouch by clicking on its icon in the Finder and hitting connect. The default user/password combination for a Jailbroken iTouch are
root/alpine. Change this as soon as you figure out how to do it. ‘Alpine’ must be the most popular password right now… The AFPd-page also contains the Wi-Fi IP Address of the iTouch and you will need it soon, so write it down.

For we are going to connect via ssh and sftp to and from iTouch/Mac. Install the OpenSSH package (under System) and the Term-vt100 package (also under System). From the Mac to iTouch you can connect via something like

ssh root@10.0.1.197

(change the number to the IP-Address of the iTouch) and login with the alpine password. You’re in! Conversely, open up the Term-vt100 icon in the springboard which give you a genuine *nix-Terminal. You can connect via ssh to your mac provided you know its IP and your login. That’s all.

Btw. you can also use your favourite file-transport program (mine is Transmit to connect to and from your iTouch via SFTP. Right, now that the iTouch is under control we might as well give it a voice of his/her own.

Install Apache (under System) and PHP (under Development) and follow the instructions from the iTouch Fans Forum (you will need to register, but if you’re not an iTouch-fan there’s little point in you reading this post anyway) and you will have turned your iTouch into a PHP-enabled webserver! On the left is a screenshot of the proof via the php-info testpage.

Finally, we can turn the world upside down completely. Before all of this we had no way to get control of the iTouch, now we can use the iTouch to take control of all our Macs serving VNC (Leopard comes with it, enable the password in System Preferences/Sharing/Screen Sharing/Computer Settings and you’re under iTouch control). To pull this off, just install the VNsea package (under Network). It really works well!

Oh, you’re only here to install the iPhone Apps…

Well, that’s easy enough. Just follow the instructions of the Install and use iPhone Apps in iPod touch from the excellent blog by Rupert Gee. The most difficult part is to get hold of the iPhone Apps if you don’t own an iPhone… Well, I’m happy to provide you with this secret information

Leave a Comment