neverendingbooks

lieven le bruyn's blog

Archive for the ‘Leopard’ tag

Snow leopard + wordpress + latex problem

without comments

Ever since I’ve upgraded to Snow Leopard I’ve been having problems with the webserver.

At first there were the ‘obvious’ problems : mysql-connection lost and php-error message. These were swiftly dealt with using the excellent Snow Leopard, Apache, PHP, MySQL and WordPress! advice from ‘tady’.

Right now, access to this blog is extremely slow (and often impossible), certainly via the admin-page. The problem appears to be that most of my CPU is used by lots of pdfetex-processes owned by www. Hence the conjecture that it is a problem with either LaTeXRender or WP LaTeX.

Anyone experiencing a similar problem, or knowing a trick to resolve it? Takk.

Written by lievenlb

October 1st, 2009 at 7:09 pm

Posted in web

Tagged with , , , , , ,

iTouch as network sniffer

with 2 comments

In the iTouch warwalking post I was considering trying to gain access to closed networks for innocent purposes such as checking mail, rather than stealing secret passwords from people allowing you free access to their wireless network, but still, I should have thought of the following possibility

Here’s a walk-through :

  • type the following command into your iTouch Terminal.app (assuming you’ve installed the BSD subsystem) :

tcpdump -v -s 65535 -w log.txt

  • once you’ve collected enough packets, cancel the command (ctrl c), AFPd the file from the iTouch to your Mac and open it with Wireshark (this is the most convenient way to install binaries under Leopard as well as an updated version of X11. For other platforms, or source code, see here)

  • do whatever black magic you feel you have to perform using Wireshark (the new name for Ethereal) or other password crackers

Written by lievenlb

February 22nd, 2008 at 9:14 pm

Posted in web

Tagged with , , , ,

overloaded iTouch

with 4 comments

A jailbroken iTouch can do many wonderful tricks : by sarting up an AFDd server one can use it in Disk mode, exactly as an iPodClassic, one can use it as a WebServer by installing Apache and PHP and run a Wiki, one can install OpenSSH and secure shell to the rest of the world, one can even turn the iTouch into a music streamer via the FireFly server, one can …

And all of this on a gadget with only 116Mb RAM and one processor running at 412MHz… is asking for overload problems both on memory and battery. A couple of days ago I wanted to start up the iTouch and was greeted by a bright flickering screen and thought I’d finally bricked it…

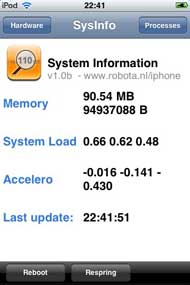
Fortunately, there’s a simple lesson to be learned : with every new feature you install, learn how to switch if off and monitor your iTouch using the SysInfo.app (under Utilities) which allows to view basic system info (screenshot below) as well as all active processes.

Here a few tricks to turn on/off the major consumers :

  1. To turn off the Apache-sever, ssh into the iTouch and give a apachectl stop command (you can always restart it with apachectl start.

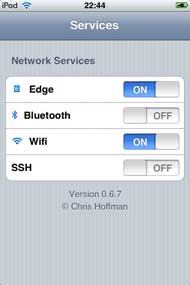
  2. To control OpenSSH, install the Services.app (under Utilities) which allows to toggle Wifi, Edge, SSH and Bluetooth on or off (screenshot below).

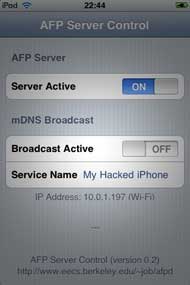
  3. To control APFd, use its control pannel to toggle the Broadcast active feature only when you need your iTouch in Disk mode (it will then appear under Shared in your Finder window, at least under Leopard. For more on this see Mount and use your iPod touch as a Thumb Drive.

  4. To control FireFly, use the UIctl.app (under Multimedia) and scroll down (after staring for about 15 seconds to a white screen) to org.fireflymediaserver.mt-daapd, tap it and start or stop the server.

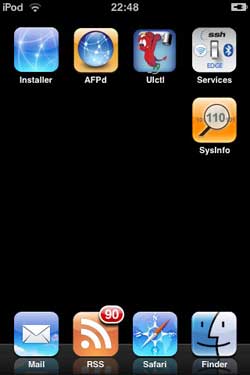
Another major consumer is the MobileRSS.app (under Productivity). Maybe I should restrict my subscriptions to the hottest blogs only

Written by lievenlb

January 5th, 2008 at 10:48 am

Posted in web

Tagged with , ,

first things first : jailbreak

with 11 comments

You may have surmised it from reading this post : Santa brought me an iPod Touch!1 Ive used an iPodClassic to transfer huge files between home (MacBook) and office (iMac) as well as for backup purposes. I wanted to find out what new tricks this trio could play now that iPod can go online. Major disillusion : one cannot even enable DiskUse via iTunes at the moment.2 What’s wrong with Apple? They make this marvelous piece of technology and then do a Golem-act preventing anyone else from using their precious thing. I understand their business plan, but soon it will make more sense to buy Apple shares than to buy their computers…

Enters the 13-year old AriX writing iJailbreak to free the iTouch. So, before you put any music or video on your pod3, dare to void the guarantee and risk your new gadget being bricked4 by Jailbreaking it! There are plenty of good guides around, both for Windows and Mac, but most of them can be slightly improved. I’ve followed Let’s Jailbreak the iPod touch 1.1.2 with OS X but shortened his downgrade to 1.1.1 procedure which is the first (and hardest) step in the whole procedure. The moment PD2 will see I can use Maps and Weather she’ll want me to jailbreak her iTouch too, so mainly for myself I list here the procedure before I forget it.

Jailbreak 1.1.2 with Leopard on Intel, use at your own risk.

Get a decent browser such as Firefox or Flock (to prevent the download to selfexpand, so when given the choice to open it with iTunes or save it to Disk, save!) and download Firmware1.1.1 and place it somewhere (why not create a Folder called Jailbreak).

Connect your iTouch and fire up iTunes and select your iTouch in the left column. Hold down the option key and click in the summary pane the Check for Update button. This will open a Finder window allowing you to navigate to the downloaded file and open it. The iTouch will downgrade itself to 1.1.1. Just wait until it reappears in iTunes and disconnect it.

With Safari on the iTouch go to jailbreakme.com and scroll to the bottom and click on the InstallAppSnap button. Let it do its magic and afterwards there is a new Installer-icon on your ‘springboard’ (the opening iTouch page). Open it and refrain from installing all the goodies now, just scroll down to Tweaks (1.1.1) open and select “OktoPrep” and install it (button top right-hand corner).

Connect iTouch to mac, start iTunes and select your iTouch. Click on the update button and now iTunes will bring you back to Firmware 1.1.2. After finishing wait until your iPod reappears in the left column. (Do not panic if you fail to see the Installer-icon on springboard, it will reappear later on). Then, close iTunes (your iPod stays connected via USB to the Mac). Use any browser on your mac to download Jailbreak 1.1.2 and place it somewhere.

Find the Java-applet jailbreak.jar in the folder and double click it. Again, magical things are happening ending with the iTouch booting up several times and you performed the Jailbreak.

Let’s open up the iTouch to the world

So, what was the point of all this? We still have no DiskUse enabled nor can we speak to the iTouch directly. But all of this is going to change rapidly. Let’s make it available to our DeskTop.

With “install package xxx” I will mean : fire up Installer from your springboard, donate as quickly as you can to the guys making this available, then click on the “install” icon lower-left. This will open up lists of packages, scroll down to package xxx, click on it to read more about it, and then hit the “install” button top-right. That’s it. (If you ever want to unistall a package, do the same process now starting from the “uninstall” icon lower-right).

Install first BSD Subsystem (under System packages) and the AFPd (under Network). This will turn your iTouch into an AFP-server. By clicking on its icon in the Springboard you can turn the server on and off (remember to turn it off when not needed!) and turn on Broadcast if you want the iTouch to show up on your Desktop (in the Leopard-Finder under ‘Shared’). You can now connect to the iTouch by clicking on its icon in the Finder and hitting connect. The default user/password combination for a Jailbroken iTouch are
root/alpine. Change this as soon as you figure out how to do it. ‘Alpine’ must be the most popular password right now… The AFPd-page also contains the Wi-Fi IP Address of the iTouch and you will need it soon, so write it down.

For we are going to connect via ssh and sftp to and from iTouch/Mac. Install the OpenSSH package (under System) and the Term-vt100 package (also under System). From the Mac to iTouch you can connect via something like

ssh root@10.0.1.197

(change the number to the IP-Address of the iTouch) and login with the alpine password. You’re in! Conversely, open up the Term-vt100 icon in the springboard which give you a genuine *nix-Terminal. You can connect via ssh to your mac provided you know its IP and your login. That’s all.

Btw. you can also use your favourite file-transport program (mine is Transmit to connect to and from your iTouch via SFTP. Right, now that the iTouch is under control we might as well give it a voice of his/her own.

Install Apache (under System) and PHP (under Development) and follow the instructions from the iTouch Fans Forum (you will need to register, but if you’re not an iTouch-fan there’s little point in you reading this post anyway) and you will have turned your iTouch into a PHP-enabled webserver! On the left is a screenshot of the proof via the php-info testpage.

Finally, we can turn the world upside down completely. Before all of this we had no way to get control of the iTouch, now we can use the iTouch to take control of all our Macs serving VNC (Leopard comes with it, enable the password in System Preferences/Sharing/Screen Sharing/Computer Settings and you’re under iTouch control). To pull this off, just install the VNsea package (under Network). It really works well!

Oh, you’re only here to install the iPhone Apps…

Well, that’s easy enough. Just follow the instructions of the Install and use iPhone Apps in iPod touch from the excellent blog by Rupert Gee. The most difficult part is to get hold of the iPhone Apps if you don’t own an iPhone… Well, I’m happy to provide you with this secret information

  1. or rather : Santa brought PD2 an iTouch and knowing his jealous nature ordered one for him as well… []
  2. rumours are that Apple will enable DiskUse in firmware 1.1.3, coming up next februari… []
  3. and frankly there’s not much else Apple allows you to put on it []
  4. but, if I can pull if off you certainly can.. []

Written by lievenlb

December 10th, 2007 at 6:56 pm

Posted in web

Tagged with , , , , , ,

NeB on Leopard and iPhone

with 2 comments

If you have an iPhone or iPod Touch and point your Safari browser to this blog you can now view it in optimised format, thanks to the iWPhone WordPress Plugin and Theme. I’ve only changed the CSS slightly to have the same greeny look-and-feel of the current redoable theme.

Upgrading a WordPress-blog running under Tiger (Mac OS 10.4) to Leopard produces a few anxiety moments. All of the standard tools (Apache, PHP and MySQL) seem no longer to work as before. For those of you who do not want to waste too much time over it, I’ll walk through the process.

After upgrading to Leopard you want to check whether your blog is still alive, so you fire up Safari and will be greeted by the message that Safari cannot find your server. Sure enough you forgot to start the WebServer in SystemPreferences/Sharing/Web Sharing. Having fixed this you will see the default Apache-screen because Leopard put these default-files in your webserver-root directory (/Library/WebServer/Documents). In case you installed your blog under a user account you will get a message that you enter forbidden territory, see below for the solution to that problem. Having removed all those index.html files (making sure NOT to delete the index.php of your blog) a more serious problem presents itself : you see the text-version of index.php meaning that PHP isnt working. You check the /etc/httpd/httpd.conf file and it still contains all the changes you made to it to get PHP running under Tiger, so what is going on?

Googling for something like ‘enabling PHP under Leopard’ you’ll discover that the configuration file used by the webserver is in a different location. It now resides at /private/etc/apache2/httpd.conf. You will have to remove the hash sign (#) at the beginning of line 114 so that it reads

LoadModule php5_module libexec/apache2/libphp5.so

Next, you have to create a php.ini file and change one line. The first thing is settled by the following Terminal-commands

cd /private/etc
sudo cp php.ini.default php.ini

and in the php.ini you have to modify line 305 so that it becomes (removing the latter part of the line)

error_reporting = E_ALL

Restarting the webserver enables PHP. If you need more details check out the article Enabling PHP and Apache in Leopard. However, you are not quite done yet. Your blog will now show the WordPress-page that something is wrong with your mysql-database. However, mysql seems to be running fine as you can check from the Terminal so PHP cannot find it.

To remedy this, you have to add the locations (after the = sign) in the follwing two lines of the php.ini file

mysql.default_socket = /private/tmp/mysql.sock
mysqli.default_socket = /private/tmp/mysql.sock

Restarting the webserver should resolve the problem. But then your blog can still choke on old PHP-code in one of the plugins you use. In my case I was using an ancient version of the PHP-Markdown plugin but after replacing it with the newest version NeB looked just like I left it with Tiger…

A final point : webpages stored in personal Sites-folders cannot be served by Apache2 and will produce a message that you have not enough privileges to view the page. To resolve this, type the following command from the Terminal

sudo cp /private/etc/httpd/users/*.conf /private/etc/Apache2/users

Written by lievenlb

December 7th, 2007 at 9:15 pm

Posted in web

Tagged with , , , , , ,