 More
More
than a month ago I started a long term project trying to make the best
of our little home network. The first couple of weeks I managed to get
iTunes, iPhoto and iMovie-files flowing from any computer to the living
room (the TV-set for photo and mpeg-files and squeezebox for audio files). The last couple of weeks I
have been making my hands dirty with some hard-ware upgrades. The key
problem being that some of our Macs have a too small hard disk for
present day needs. For example, PD2 could no longer play The Sims (and
their never ending extensions) on her 6 Gb iMac, so one day she simply
decided to get rid off most things in het Applications-folder, a
desperate cry for attention. Together with Jan I took our two 6 Gb
slot-loading iMacs apart and replaced them by a 120 Gb resp. 80 Gb hard
disk, giving the Sims ample virtual space to expand (I hope). Beginning
of this week I finished the slightly more daunting task of upgrading an
original 4 Gb front-loading iMac to a performing 120 Gb potential
Server. But I knew that the worst part was still to come : my old
(colored) iBook was making so much noise that I didn’t use it anymore
for anything demanding some kind of concentration (like writing papers).
So I wanted to replace the old 6 Gb noisy disk with a silent Hitachi
2.5 HDD 20GB 5400RPM ATA100 8Mb Cache-hard disk. However I did read
the instructions and was a bit put off by this.
Luckily, I had to wait because I didn’t have the appropriate material.
Whereas any super-market sells Torx- 10 and 15 screwdrivers, I needed an
8 or 9. Eventually I found one in a good shop (they even have torx 6 and
7, it seems you need those to take your mobile apart), so no more
excuses. Tuesday afternoon I had a first try but already between stage 2
and 3 of the instructions I cut an essential connection (for the
trackpad)… and quickly assembled everything again (I could still use
my iBook with a USB-mouse…). This morning, when the rest of my family
left at 8 o’clock, I had another go (btw. never try to do this unless
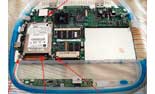
you can afford to loose your iBook). The whole process is pretty scary :
you have to take out your keyboard, modem, CD-player, display and a few
minor ingredients before you get at the hard-disk. At the time you do,
the whole table is filled with parts and several cups containing some
screws which you will hopefully remember to put back in the correct
place. Still, in less than two hours I managed to replace the harddisk
and put everything back together (I lost some tome because at the end
one needs to remove some bolts and I didnt have a good tool available so
I had to improvise). I didn’t expect anything when I powered up the
iBook but somehow it reacted ok, I could start up from a System9 CD and
initialize the harddisk and even put System9 on it, but there was
something strange : all message-windows appeared at the lower right hand
side of the display… When I did restart from the HD, it became
apparent that I lost about 30% of my screen, including the part where
one normally sees the HD, CDs etc., so I had a small problem. But, after
my success of conquering my hard-ware phobia, I was not alarmed, I
cycled to the university and had a chat with Jan about it. He suggested
zapping the PRAM which I did in the afternoon, without any effect
on my partial display. So, perhaps it was a hard-ware thing after all
and I had to take my iBook apart again until I got at the connections
for the display (which is step 6 out of 8 of the instructions). Then,
the problem became clear : in reassembling the display-connectors I had
used a bit too much force so that some of the spikes were bend. But,
after repairing this and closing up the iBook again, the problem was
solved. So I have now a 20 Gb iBook with a nice quiet harddisk and I
“only” lost my trackpad and sound in the process… a good deal I
would say.
iHome phase 2 ended
Published in web
Comments