Perhaps, the tips and tricks I did receive to turn a selection of wordpress-posts into a proper ePub-file may be of use to others, so I will describe the procedure here in some detail.
It makes a difference whether or not some of the posts contain TeX. This time, I’ll sketch the process for non-LaTeX posts and hence we will turn the Bourbaki-code posts into ePub-format to read on your iPad, rather than merely into a pdf-file as last time. Next time, I’ll add some tricks to repeat this when some of your posts do contain LaTeX.
1. Install the ePub export plugin
Get the epub export wordpress plugin, install and activate it in the usual way. ePub Export automatically creates an ePub file when a post or page is published or updated. The ePubs are stored in the uploads directory. For later use, remember that your uploads directories are located under BLOGHOME/wp-content/uploads.
2. Update the posts you want to include
Decide which posts you want to include in your eBook, edit them (or not) and press for each one of them the update-button. This will populate today’s uploads-directory with a number of epub-files. Transfer them all, for example using Transmit, to a directory on your home-computer, named say MyFirstEBook.
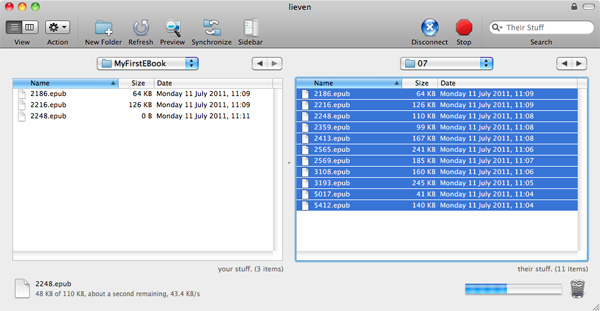
3. Unpack the epub-files
The crucial fact to remember about epub-files is that they are really zipped archives containing xhtml-, css- and other files and directories. As we want to edit some of those, we first have to unpack the directories. So, change the .epub extensions to .zip and double-click on them to create the directories.
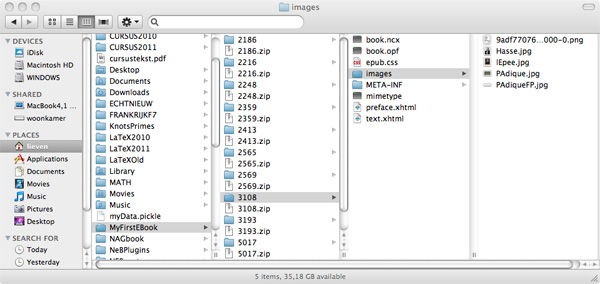
The crucial files in each directory are preface.xhtml (containing title author and blog-name), text.html (containing the blog-post) and the images-directory (containing copies of all the images used in the post).
4. Rename the directories user-friendly
As all the posts will be chapters in our eBook in some specific order, we will rename the numbers of the directories to something more user-friendly such as shortened blog-titles. To do this, double-click in each of the directories on the preface.xhtml file. This will open Safari and will show the title of the blog-post. Use it to rename that directory. For convenience let us call the directory corresponding to the first chapter in our book MasterDirectory
5. Move all images to the master directory
For each of the other chapter-directories, drag all the files contained in the images-subdirectory to MasterDirectory/images.
6. Edit the MasterDirectory/text.xhtml file
Because we will have to open and copy-paste all the text.xhtml files of the different directories, it is perhaps best to rename momentarily the MasterDirectory/text.xhtml file to something like master.xhtml.
Now, open this file with a text-processor such as TextWrangler. Edit it to remove unwanted html-code (such as links to other posts at the start if you are using the series-plugin, or previous/next post links at the end). Also add the title of the blog-post between h1-tags (and if you want to include a table of contents later, give it an anchor-name).
Go to the directory of your second chapter, open that text.xhtml file and copy/paste only the post-content over to the master-xhtml file at the appropriate place. As before, add title/anchor before the copied post-content.
Repeat this procedure, in order, for all the chapters of your eBook.
Once finished, doubleclick the master.xhtml file and correct remaining errors (as it is an xhtml-file, it is rather picky about opening and closing tags) and see whether all your images are included. If you’re satisfied with it, rename the master.xhtml to text.xhtml (don’t forget this!).
7. Edit the MasterDirectory/preface.xhtml file
Open the preface.xhtml file and change the first blogpost-title to the title of your booklet, alter your name (by default it uses your wp-nick) and add a frontipiece-picture if you so desire.
8. Re-package the directory into an epub-file
This is the (only) tricky part. E-book readers require that the mimetype file is the first one in the zip document. What’s more, to be fully compliant, this file should start at a very specific point – a 30-byte offset from the beginning of the zip file (so that the mimetype text itself starts at byte 38).
Here’s how to do this on a Mac (Linux-users being the geeks they are will have given up on reading this post a while ago and as to Windows-users, yeah well …). Open Terminal.app and cd to your MasterDirectory. Now type:
zip -X MyFirstEBook.epub mimetype
Next, type:
zip -rg MyFirstEBook.epub * -x *.DS_Store
(of course you’ll have to change your book-title to whatever you want). If you want to know more about these 2 magical commands, read this post.
9. Edit metadata
Get Calibre and add the MyFirstEBook.epub to Calibre by clicking on the ‘Add Books’ button.

You can preview your eBook by clicking on the ‘View’-button. Next, click the ‘Edit metadata’-button and alter the title and author entries (and whatever else you want to include) and click the OK button. Then click ‘Save to disk’.
10. Read your eBook on your iPad
Finally, we want to see how it looks on the iPad. Mail MyFirstEBook.epub to yourself as attachement, open it with iBooks and enjoy!
Comments