 You may have surmised it from reading this post : Santa brought me an iPod Touch! (( or rather : Santa brought PD2 an iTouch and knowing his jealous nature ordered one for him as well… )) Ive used an iPodClassic to transfer huge files between home (MacBook) and office (iMac) as well as for backup purposes. I wanted to find out what new tricks this trio could play now that iPod can go online. Major disillusion : one cannot even enable DiskUse via iTunes at the moment. (( rumours are that Apple will enable DiskUse in firmware 1.1.3, coming up next februari… )) What’s wrong with Apple? They make this marvelous piece of technology and then do a Golem-act preventing anyone else from using their precious thing. I understand their business plan, but soon it will make more sense to buy Apple shares than to buy their computers…
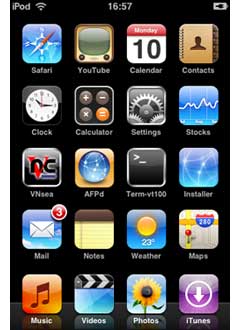
Enters the 13-year old AriX writing iJailbreak to free the iTouch. So, before you put any music or video on your pod (( and frankly there’s not much else Apple allows you to put on it )), dare to void the guarantee and risk your new gadget being bricked (( but, if I can pull if off you certainly can.. )) by Jailbreaking it! There are plenty of good guides around, both for Windows and Mac, but most of them can be slightly improved. I’ve followed Let’s Jailbreak the iPod touch 1.1.2 with OS X but shortened his downgrade to 1.1.1 procedure which is the first (and hardest) step in the whole procedure. The moment PD2 will see I can use Maps and Weather she’ll want me to jailbreak her iTouch too, so mainly for myself I list here the procedure before I forget it.
Jailbreak 1.1.2 with Leopard on Intel, use at your own risk.
Get a decent browser such as Firefox or Flock (to prevent the download to selfexpand, so when given the choice to open it with iTunes or save it to Disk, save!) and download Firmware1.1.1 and place it somewhere (why not create a Folder called Jailbreak).
Connect your iTouch and fire up iTunes and select your iTouch in the left column. Hold down the option key and click in the summary pane the Check for Update button. This will open a Finder window allowing you to navigate to the downloaded file and open it. The iTouch will downgrade itself to 1.1.1. Just wait until it reappears in iTunes and disconnect it.
With Safari on the iTouch go to jailbreakme.com and scroll to the bottom and click on the InstallAppSnap button. Let it do its magic and afterwards there is a new Installer-icon on your ‘springboard’ (the opening iTouch page). Open it and refrain from installing all the goodies now, just scroll down to Tweaks (1.1.1) open and select “OktoPrep” and install it (button top right-hand corner).
Connect iTouch to mac, start iTunes and select your iTouch. Click on the update button and now iTunes will bring you back to Firmware 1.1.2. After finishing wait until your iPod reappears in the left column. (Do not panic if you fail to see the Installer-icon on springboard, it will reappear later on). Then, close iTunes (your iPod stays connected via USB to the Mac). Use any browser on your mac to download Jailbreak 1.1.2 and place it somewhere.
Find the Java-applet jailbreak.jar in the folder and double click it. Again, magical things are happening ending with the iTouch booting up several times and you performed the Jailbreak.
Let’s open up the iTouch to the world
So, what was the point of all this? We still have no DiskUse enabled nor can we speak to the iTouch directly. But all of this is going to change rapidly. Let’s make it available to our DeskTop.
With “install package xxx” I will mean : fire up Installer from your springboard, donate as quickly as you can to the guys making this available, then click on the “install” icon lower-left. This will open up lists of packages, scroll down to package xxx, click on it to read more about it, and then hit the “install” button top-right. That’s it. (If you ever want to unistall a package, do the same process now starting from the “uninstall” icon lower-right).
Install first BSD Subsystem (under System packages) and the AFPd (under Network). This will turn your iTouch into an AFP-server. By clicking on its icon in the Springboard you can turn the server on and off (remember to turn it off when not needed!) and turn on Broadcast if you want the iTouch to show up on your Desktop (in the Leopard-Finder under ‘Shared’). You can now connect to the iTouch by clicking on its icon in the Finder and hitting connect. The default user/password combination for a Jailbroken iTouch are
root/alpine. Change this as soon as you figure out how to do it. ‘Alpine’ must be the most popular password right now… The AFPd-page also contains the Wi-Fi IP Address of the iTouch and you will need it soon, so write it down.
For we are going to connect via ssh and sftp to and from iTouch/Mac. Install the OpenSSH package (under System) and the Term-vt100 package (also under System). From the Mac to iTouch you can connect via something like
ssh root@10.0.1.197
(change the number to the IP-Address of the iTouch) and login with the alpine password. You’re in! Conversely, open up the Term-vt100 icon in the springboard which give you a genuine *nix-Terminal. You can connect via ssh to your mac provided you know its IP and your login. That’s all.
 Btw. you can also use your favourite file-transport program (mine is Transmit to connect to and from your iTouch via SFTP. Right, now that the iTouch is under control we might as well give it a voice of his/her own.
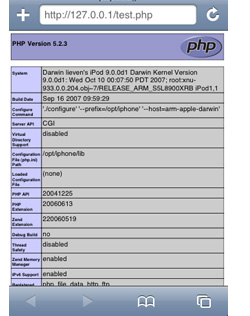
Install Apache (under System) and PHP (under Development) and follow the instructions from the iTouch Fans Forum (you will need to register, but if you’re not an iTouch-fan there’s little point in you reading this post anyway) and you will have turned your iTouch into a PHP-enabled webserver! On the left is a screenshot of the proof via the php-info testpage.
Finally, we can turn the world upside down completely. Before all of this we had no way to get control of the iTouch, now we can use the iTouch to take control of all our Macs serving VNC (Leopard comes with it, enable the password in System Preferences/Sharing/Screen Sharing/Computer Settings and you’re under iTouch control). To pull this off, just install the VNsea package (under Network). It really works well!
Oh, you’re only here to install the iPhone Apps…
Well, that’s easy enough. Just follow the instructions of the Install and use iPhone Apps in iPod touch from the excellent blog by Rupert Gee. The most difficult part is to get hold of the iPhone Apps if you don’t own an iPhone… Well, I’m happy to provide you with this secret information…
Comments