At present, some interesting experiments are going on exploring the potential of web 2.0 for mathematical research, that is, setting up a usable math 2.0 – environment.
The starting point is that math 2.0 should be something like blogs+extras. Most mathematicians are not that interested in the latest ICT-tools, but at least they are slowly getting used to reading blogs, so we should stick to this medium and try to enhance it for online-research.
Michael Nielsen has written a couple of posts on this : an after-dinner talk about doing science online aiming at a mathematics audience, building on an essay on the future of science.
 Both posts were influential to Tim Gowers‘ dream of massively collaborative mathematics. He took an interesting problem, laid down a set of 12 rules-of-conduct and invited everyone to contribute. The project is still gaining momentum and Terry Tao is also posting about it on his blog.
Michael Nielsen compared Gowers’ approach to long established practice in the open-source software community.
Another interesting experiment is nLab, a knowledge-wiki set up by the reader-community of the n-category cafe. They describe it as : “In other words: this place is like the library, or alchemist’s laboratory, in the back room of the n-Category Café. You come here to work and go there to chat.
We are hoping to create here a space for presentation and archival storage of collaborative work of encyclopedic, didactic, expositional, but also original nature. This will include, but not be limited to, the subjects being discussed every day in the n-Café.”
Both experiments are working great, aided by the authority-status of the blogger, resp. the popularity of the blog, within the research topic. But, what about topics failing to have a blogger or blog of similar status? Should we all drop our current research-interest and convert to either combinatorics or higher-categories?
History taught us in case of failing authority we’d better settle for ‘manageable anarchy’. So, here’s my math2.0-anarchy-allowed-proposal :
- per research-topic (say, an arXiv-topic) we’ll set up a seperate online-reasearch-environment
- anyone interested in that topic is allowed to register and fill-out a profile linking to her list of publications, describe his research interests, her ongoing projects and other trivia
- some may want to start a blog within the environment or join an already existing one, and should be allowed to do so
- some may opt just to read blog posts and occasionally comment, and again, should be allowed to do so
- some may want to set up a research-group to solve a specific problem. they may choose to do this in the open, or as a covert-operation, taking on new members only by invitation
- some may use the environment mainly for networking or chatting-up with their friends
- some research-groups may want to start a group-blog or knowledge-wiki to archive their finds
- surely we’ll be not discussing math in ASCII but in latex
- anyone will be able to follow specific sub-projects via RSS-feeds
- anyone can see site-wide activity online, see who’s currently there and chat if they feel the need
- anyone can do whatever sensible web2.0-thing there is I forgot by age and hence by ignorance
If this seems like a tall order to satisfy, a bit of research will show that we live at the fortunate moment in time when all the basic ingredient are there, freely available, to do just that!
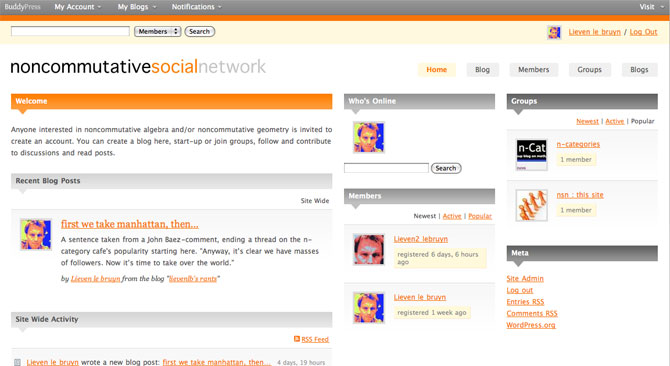
Over the last weeks I’ve wasted too many hours googling for help, reading-up different fora to get it all working, but … somehow succeeded. Here’s a screen-shot of my very-own NSN (for : noncommutative-social-network) :
Please allow me a few more days to tidy things up and then I’ll make the link available so that anyone interested can experiment with it.
But then, I’ve no desire to spend my days web-mastering such a site. Perhaps some of you would like to take this on, provided you’d get it on a silver plate? (that is, without having to spend too much time setting it up).
So. I’ll run a series of posts explaining how to “set-up your own math2.0 environment”. I’m not aiming at the internet-savvy ones (they’ll probably do it a lot more efficiently), but at people like myself, who are interested to investigate web-based possibilities, but need to be told where to find the very basics, such as the location of their httpd.conf file or their php.ini and such.
I’ve zeroed my MacBookPro, re-installed OSX 10.5 from scratch, upgraded it to current 10.5.6 but no extras (say, vanilla 10.5.6). And I’ll guide you from there, in all gory details, with plenty of screen-shots as I would have liked to find them when I tried to set this up.
One Comment


 Of course, excellent math-blogs exist in every language imaginable, but my linguistic limitations restrict me to the ones written in English, French, German and … Dutch. Here a few links to Dutch (or rather, Flemish) math-blogs, in order of proximity :
 “This week I did spend much of my time at the Fifth European Mathematical Congress in Amsterdam. Several mathematicians suggested I should have a chat with